
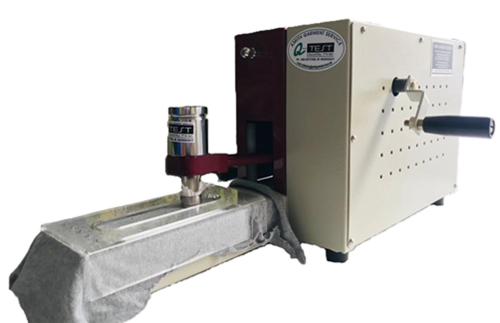
Anyone who has spent time in a textile testing lab knows that a fabric can look perfect on the rack and still fail a buyer’s compliance check within minutes of rubbing fastness testing. This is where a clear understanding of the crock meter diagram becomes genuinely useful — not as a theoretical drawing, but as a practical map of how colour transfer gets measured, verified, and documented before a garment ships.
For textile laboratories, garment manufacturers, and quality-control teams, the crock meter diagram connects several ideas at once: how the crock meter itself is built, how rubbing fastness is generated mechanically, and why that mechanical action translates directly into a colour fastness rating a buyer can trust. Once you understand the diagram, interpreting test results — and troubleshooting inconsistent ones — becomes far more intuitive.
What Is a Crock Meter?
A crock meter is a mechanical testing instrument used to evaluate how well a textile’s colour resists transferring onto another surface through rubbing, a phenomenon commonly called “crocking.” It works by rubbing a piece of standard test cloth against a fixed fabric specimen under controlled pressure and a set number of strokes, then assessing how much colour has migrated onto that test cloth.
The instrument is typically used on dyed, printed, or finished fabrics — including denim, apparel fabric, upholstery textiles, and home furnishings. Rubbing is performed because everyday handling, wear, and friction can loosen surface dye particles that were not properly fixed during dyeing or finishing. Colour transfer is evaluated visually or instrumentally against a grey scale, which grades how much staining occurred on the rubbing cloth. Crock meters are commonly found in textile testing laboratories, garment quality-control departments, dye houses, and buying house inspection units.
What is a crock meter used for? A crock meter is used for testing a fabric’s colour fastness to rubbing. It rubs a standard cloth against a specimen under controlled pressure and stroke count, then measures how much dye transfers onto the rubbing cloth, helping labs assess dry and wet crocking performance.
Crock Meter Diagram: Main Parts and Their Functions
A typical crock meter diagram breaks the instrument down into a handful of functional components. While exact construction can vary between manufacturers and models, most crock meters share a similar layout built around a base, a specimen mounting area, and a rubbing mechanism.
The base or support platform anchors the entire assembly and keeps the testing surface stable during operation. The specimen holder secures the fabric sample flat against the base so it doesn’t shift while being rubbed. A fabric clamping arrangement works alongside the holder to keep the specimen taut and correctly positioned throughout the test cycle.
The rubbing finger, sometimes called the rubbing head, is the component that makes direct contact with the specimen. A standard rubbing cloth — typically a specified cotton test cloth — is mounted onto this finger and receives any colour that transfers during rubbing. The operating arm connects to the rubbing finger and produces the back-and-forth rubbing motion, usually driven by a crank or handle on manual units, or a motor on automated ones.
A counter helps the operator track and control the number of rubbing cycles, since test methods specify an exact stroke count. The weight or loading mechanism applies the specified contact pressure between the rubbing finger and the specimen — consistent pressure is essential for repeatable results. A guide mechanism keeps the rubbing motion travelling in a straight, consistent path across the sample mounting area.
| Crock Meter Part | Function |
| Specimen Holder | Holds the textile specimen securely |
| Rubbing Finger | Applies controlled rubbing contact |
| Rubbing Cloth | Receives transferred colour |
| Operating Arm | Produces the rubbing movement |
| Counter | Helps control the number of rubbing cycles |
| Base | Supports the testing assembly |
| Loading Mechanism | Applies the specified contact pressure |
Each part depends on the others: the base and holder keep the specimen still, the loading mechanism sets the pressure, the operating arm and rubbing finger generate motion, and the rubbing cloth captures the evidence — the transferred colour — that gets evaluated afterward.
How Does a Crock Meter Work?
The operating principle behind a crock meter is straightforward once you follow it step by step:
- Prepare the textile specimen according to the applicable test method.
- Mount the specimen securely onto the specimen holder.
- Place the specified rubbing cloth onto the rubbing finger.
- Apply the required contact pressure using the loading mechanism.
- Move the rubbing head across the specimen for the specified number of cycles.
- Remove the rubbing cloth once testing is complete.
- Assess colour transfer on the rubbing cloth using the applicable grey scale or evaluation procedure.
Consistency matters at every one of these steps. Contact pressure, rubbing direction, stroke count, and sample preparation all directly influence the result — a slightly loose specimen or an uneven number of strokes can shift a fabric from a passing grade to a failing one, even when the fabric itself hasn’t changed.
How does a crock meter work? A crock meter works by rubbing a standard test cloth against a mounted fabric specimen under fixed pressure for a set number of strokes. The rubbing cloth is then examined for colour transfer, which is graded against a standard grey scale to determine the fabric’s rubbing fastness rating.
Crock Meter Diagram and Rubbing Fastness Test
Every component shown in a crock meter diagram plays a direct role in the rubbing fastness test. The rubbing finger and loading mechanism generate mechanical abrasion on the fabric surface. This abrasion can dislodge dye particles that weren’t fully fixed during dyeing, allowing them to migrate onto the rubbing cloth — a process linked closely to fabric surface characteristics and dyestuff migration behaviour.
Rubbing fastness testing is generally performed under two conditions: dry rubbing and wet rubbing. Dry crocking uses a dry rubbing cloth and reflects how colour behaves under ordinary friction, like a bag strap rubbing against a garment. Wet crocking uses a rubbing cloth moistened according to the test method, simulating conditions such as perspiration or damp handling, where moisture can make it easier for dye to transfer. Evaluating both conditions gives a fuller picture of a fabric’s real-world colour stability.
Dry Crock Test vs Wet Crock Test
| Feature | Dry Crock Test | Wet Crock Test |
| Rubbing Cloth | Dry | Moistened under the specified procedure |
| Main Purpose | Evaluates dry rubbing colour transfer | Evaluates colour transfer under wet conditions |
| Moisture | Not intentionally introduced | Controlled moisture is involved |
| Application | General rubbing performance | Conditions where moisture can influence colour transfer |
Moisture can sometimes make dye particles easier to dislodge from a fabric surface, which is why wet crock results are often watched closely for darker or heavily dyed fabrics such as denim. That said, this isn’t a fixed rule — wet rubbing does not always produce a lower fastness rating than dry rubbing, since the outcome depends on the specific dye, fibre, and finishing used on that fabric.
What is the difference between dry and wet crock testing? Dry crock testing rubs a dry cloth against the fabric to evaluate ordinary friction-related colour transfer. Wet crock testing uses a moistened rubbing cloth to simulate conditions like perspiration or dampness. Both tests help labs understand how a fabric’s colour holds up under different real-world handling conditions.
International Standards for Crock Meter Testing
Two standards commonly guide crock meter testing: ISO 105 X12, an internationally recognised method for assessing colour fastness to rubbing, and the AATCC 8 Test Method, widely used in North American textile testing for the same purpose. Both describe the general procedure for dry and wet crocking, though their specified conditions — such as rubbing cloth type, stroke count, and evaluation criteria — can differ in detail.
Laboratories should always consult the current applicable edition of whichever standard their buyer or market requires, rather than relying on generic machine settings. Requirements such as the number of rubbing cycles, applied pressure, specimen preparation, rubbing cloth type, and evaluation procedure should be controlled precisely according to the selected standard to ensure the result is valid and comparable.
Which standards are used for crock meter testing? Crock meter testing is commonly guided by ISO 105 X12, an international method for colour fastness to rubbing, and the AATCC 8 Test Method, widely used in North America. Both cover dry and wet crocking procedures, though exact parameters vary, so labs should follow the specific edition required by their buyer.
Why Is a Crock Meter Used for Textile Quality Control?
Rubbing fastness testing has practical applications across fabric manufacturing, garment manufacturing, denim production, dyed and printed textiles, home textiles, upholstery, and general apparel. Export-focused units and buying houses rely on crock meter results as part of routine compliance testing before shipments are approved.
Catching a colour-transfer problem at the fabric or garment stage — rather than after a customer complaint — protects both the manufacturer’s reputation and the buyer relationship. This is one reason rubbing fastness testing is treated as a standard checkpoint rather than an optional one in most export-oriented quality-control programs.
Factors That Affect Rubbing Fastness Results
Several practical factors influence rubbing fastness outcomes: fabric construction, fibre type, dye selection, dye fixation quality, fabric finishing, and surface texture all play a role in how easily colour transfers. Test-side variables matter just as much — moisture content, rubbing pressure, number of rubbing cycles, rubbing cloth condition, sample preparation, operator technique, and the general condition of the instrument itself can all shift results.
Because so many variables are involved, poor test control can affect repeatability even when the fabric being tested hasn’t changed. This is why consistent instrument maintenance and disciplined test procedure matter as much as the fabric’s actual dye quality.
How to Read a Crock Meter Diagram Correctly
For a lab technician or textile student, the easiest way to read a crock meter diagram is to follow the functional sequence it represents:
Sample → Holder → Rubbing Finger → Rubbing Cloth → Controlled Movement → Colour Transfer → Evaluation
Each mechanical component in the diagram corresponds to a step in that sequence, and understanding this flow makes it much easier to diagnose an unexpected result — for instance, checking whether the holder is secure or the loading mechanism is applying correct pressure. A diagram is a helpful reference, but it should always be used alongside the instrument’s operating instructions and the applicable test standard rather than as a stand-alone guide.
Where Is Crock Meter Testing Used?
Crock meter testing is a routine part of textile and garment quality control across India’s manufacturing hubs, including centres like Bangalore and Tiruppur, where fabric mills, garment export units, and textile testing laboratories operate at scale. Buying houses and quality-control departments across the country rely on consistent rubbing fastness data to meet the compliance expectations of international buyers.
Given how central textile and garment exports are to India’s manufacturing economy, reliable colour fastness testing plays a meaningful role in maintaining product quality and buyer confidence at scale.
Choosing the Right Crock Meter
Selecting a crock meter involves more than picking any available unit. Buyers should evaluate compatibility with the testing standards they need to follow, overall construction quality, and repeatability of results across repeated tests. Ease of operation, a reliable counter mechanism, and a well-designed loading arrangement all affect day-to-day usability in a busy lab.
It’s also worth considering rubbing head design, calibration requirements, and whether the supplier offers technical support when questions arise. Laboratory workload, documentation needs, and after-sales service are practical, ongoing considerations — not just one-time purchase factors.
Why Choose Amith Garment Services for Textile Testing Equipment?
Amith Garment Services works with textile testing equipment, garment testing instruments, and fabric testing equipment suited to the practical needs of textile laboratories and quality-control teams. Along with crock meters, the equipment range extends to instruments used across the broader testing workflow, including light booths, colour matching cabinets, washing fastness testers, GSM cutters, fabric inspection machines, bursting strength testers, and fabric rolling machines.
For labs looking for technical guidance on selecting or maintaining testing instruments, Amith Garment Services provides product information geared toward real laboratory requirements rather than generic specifications. More details on the full equipment range are available at amithgarmentservices.com.
Conclusion
A crock meter is a focused, reliable instrument for evaluating how well a fabric’s colour resists rubbing, and the crock meter diagram is simply a practical guide to how its parts — the holder, rubbing finger, rubbing cloth, operating arm, and loading mechanism — work together to produce that result. Understanding dry versus wet crocking, following the relevant ISO 105 X12 or AATCC 8 procedure, and controlling variables like pressure and stroke count all contribute to consistent, trustworthy rubbing fastness data. For textile laboratories and garment manufacturers alike, keeping a clear mental picture of the crock meter diagram makes day-to-day testing and troubleshooting considerably easier.
Frequently Asked Questions
A crock meter diagram is a labelled illustration that shows the working parts of a crock meter — including the base, specimen holder, rubbing finger, rubbing cloth, operating arm, and loading mechanism. It helps lab technicians and students understand how each part contributes to the rubbing fastness testing process, from mounting the fabric specimen to generating controlled rubbing motion and assessing colour transfer afterward.
A crock meter is used for evaluating a textile's colour fastness to rubbing, also known as crocking. It works by rubbing a standard test cloth against a fabric specimen under fixed pressure for a specified number of strokes, then assessing how much colour transferred onto the rubbing cloth. It's commonly used on dyed, printed, and finished fabrics across garment and textile manufacturing.
The main parts of a crock meter typically include the base, specimen holder, fabric clamping arrangement, rubbing finger, standard rubbing cloth, operating arm, crank or handle, counter, and loading mechanism. Exact construction can vary between manufacturers and models, but these components generally work together to hold the specimen, apply controlled pressure, and generate consistent rubbing motion during testing.
Dry crock testing uses a dry rubbing cloth to evaluate how a fabric's colour transfers under ordinary friction, while wet crock testing uses a rubbing cloth moistened according to the applicable test method, simulating conditions like perspiration or dampness. Both tests are important because moisture can influence how easily dye particles dislodge from certain fabrics, giving labs a fuller picture of real-world colour stability.
A crock meter is used to test how well a fabric's colour resists rubbing off onto other surfaces, which helps labs check for colour fastness before garments go to buyers.
It rubs a standard test cloth against a fabric sample under set pressure and stroke count, then checks how much colour transferred using a grey scale.
It shows the crock meter's parts, like the rubbing finger, specimen holder, and operating arm, and how they work together during testing.
It helps manufacturers catch colour-transfer problems before garments reach customers, protecting product quality and buyer trust.