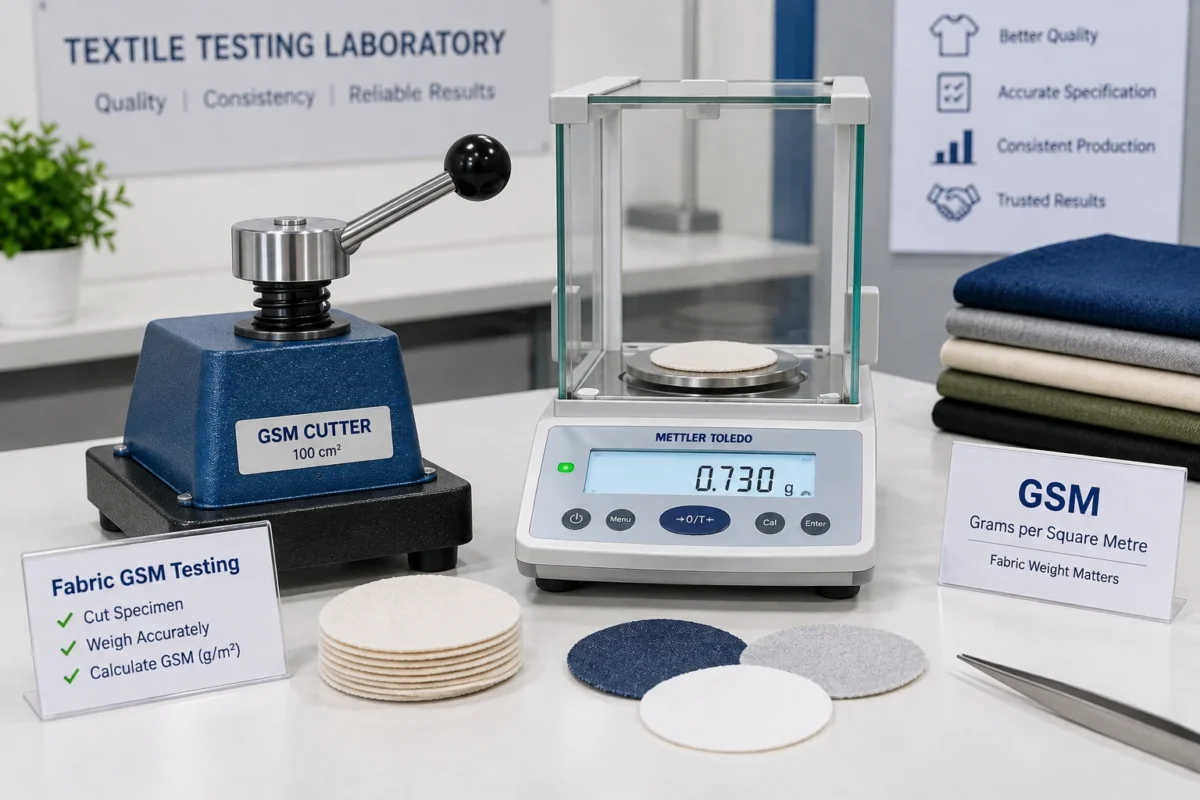
GSM Machine for fabric weight testing in textile laboratory

What Is a GSM Machine and How Does It Work?

If you have spent any time in a fabric mill, a garment factory, or a buying house quality lab, you have probably heard someone ask, “What’s the GSM on this fabric?” It’s one of the first questions raised when a new fabric lot arrives, and for good reason. Fabric weight tells you a lot about how a material will behave — how it drapes, how it feels, how much yarn goes into it, and whether it meets the specification a buyer signed off on.

This is where a GSM Machine comes in. It’s a simple but essential piece of textile testing equipment used to determine how many grams a square metre of fabric weighs. Whether you’re running a spinning mill, managing quality at a garment export unit, or studying textile engineering, understanding how this instrument works will help you read fabric specification sheets with more confidence and catch quality issues before they become costly.

In this article, we’ll walk through what GSM actually means, how a GSM testing machine works step by step, and why this small but important test plays such a big role in textile manufacturing and garment exports.

What Is a GSM Machine?

GSM stands for Grams per Square Metre — a standard unit used across the textile industry to express fabric weight. A GSM Machine, sometimes called a GSM tester or fabric weight tester, is a laboratory instrument used to measure this value on a fabric sample.

In simple terms, fabric weight is the raw physical weight of a piece of cloth, while GSM is that weight expressed per unit area. Two fabrics can look similar but have very different GSM values depending on yarn thickness, weave density, or knitting structure. That’s why relying on “how heavy it feels” isn’t enough — a proper GSM test gives you a measurable, comparable number.

GSM matters because it directly affects cost, performance, and buyer acceptance. A shirt fabric specified at 120 GSM will behave very differently from one at 200 GSM, even if both are cotton. Getting this number right helps mills, exporters, and quality teams stay aligned on what’s actually being produced.

What is a GSM Machine? A GSM Machine is a textile testing instrument used to measure fabric weight in grams per square metre. It typically works with a precision cutter and a weighing balance to calculate how much a specific fabric area weighs, helping determine fabric quality and consistency.

How Does a GSM Machine Work?

The working principle behind a GSM testing machine is straightforward, even though the process requires care and consistency. Here’s how it typically works in a textile lab:

  1. Fabric sample selection – A representative piece of fabric is chosen, avoiding folds, selvedges, or visibly damaged areas.
  2. Conditioning where required – Depending on the applicable testing procedure, samples may be conditioned at standard temperature and humidity before testing.
  3. Cutting the test specimen – A GSM cutter is used to cut a fabric circle or square of a known, fixed area.
  4. Using a standard specimen size – Round cutters of a defined diameter are common in many labs, since they simplify area calculation.
  5. Weighing the sample – The cut specimen is placed on a precision weighing balance to record its weight in grams.
  6. Calculating fabric GSM – The weight is converted mathematically to represent one full square metre.
  7. Recording and interpreting the result – The final GSM value is logged and compared against the buyer’s specification or internal quality standard.

A simplified GSM calculation example: if a fabric specimen cut to a known area weighs a certain number of grams, that weight is scaled up proportionally to represent a full square metre. For instance, a small circular sample represents a known fraction of a square metre, so the recorded weight is multiplied accordingly to arrive at the final GSM figure. Many GSM testing machines and cutters are designed around standard specimen sizes specifically to make this calculation simple and repeatable.

How does a GSM Machine work? A GSM Machine works by cutting a fabric sample of known area using a GSM cutter, weighing it on a precision balance, and mathematically converting that weight into grams per square metre. This gives a standardized, comparable fabric weight value.

GSM Machine and GSM Cutter – What Is the Difference?

People often use “GSM Machine,” “GSM Tester,” and “GSM Cutter” interchangeably, but each refers to a slightly different part of the testing process.

Component Function
GSM Machine / GSM Tester General term for the overall testing setup used to determine fabric GSM
GSM Cutter Precision tool used to cut a fabric specimen of a fixed, known area
Weighing Balance Precise scale used to record the weight of the cut specimen in grams

In practice, GSM testing usually involves a cutting tool paired with an accurate weighing instrument. Some labs use a combined setup, while others use a dedicated GSM cutter alongside a separate analytical balance. Both components need to work together reliably — an inaccurate cutter or an uncalibrated balance can lead to misleading GSM results, regardless of how good the rest of the process is.

Why Is GSM Testing Important in Textile Manufacturing?

GSM testing isn’t just a lab formality — it has real, practical consequences across the production chain.

  • Maintaining fabric specifications as agreed with buyers or brands
  • Batch-to-batch consistency, especially across large production runs
  • Cost estimation and material consumption planning, since GSM affects how much fabric is needed per garment
  • Production planning, particularly for cutting and sewing operations
  • Garment construction quality, since fabric weight influences drape, structure, and finish
  • Export quality requirements, where buyers often specify acceptable GSM tolerance
  • Detecting variation between different rolls or lots of the same fabric order

Incorrect GSM can affect how a garment hangs, how it feels to the wearer, its durability, and even how it performs in downstream processes like cutting and stitching. A fabric that’s lighter than specified might feel flimsy or transparent, while one that’s heavier than ordered could throw off costing and shipping weight calculations.

Why is GSM testing important? GSM testing is important because it verifies whether fabric meets the specified weight, ensuring consistency across production batches, accurate costing, and compliance with buyer requirements. Incorrect GSM can affect fabric drape, durability, garment appearance, and overall production quality.

GSM Testing Procedure for Fabric

While exact steps can vary depending on the applicable standard or buyer specification, a typical GSM testing procedure in a textile laboratory follows this general workflow:

  • Select a representative area of the fabric roll
  • Avoid creases, stains, torn edges, or visibly defective sections
  • Cut the specimen using a GSM cutter at the chosen location
  • Weigh the specimen accurately on a calibrated balance
  • Record the result along with sample details
  • Repeat the test at multiple points across the fabric where required
  • Calculate the average GSM from multiple readings

Representative sampling matters because fabric weight can vary slightly across a roll due to tension, finishing, or manufacturing inconsistencies. A single reading from one spot doesn’t always reflect the true average GSM of the entire batch, which is why many labs test multiple points rather than relying on just one specimen. It’s worth noting that not every laboratory or buyer follows an identical procedure — the applicable standard or in-house testing protocol should always guide the exact steps taken.

GSM Machine vs Manual GSM Testing

Feature GSM Machine/Tester Manual GSM Testing
Testing process Standardized cutting and weighing setup Estimated or improvised measurement
Accuracy Generally higher, based on calibrated instruments Depends heavily on operator skill and tools used
Speed Faster, especially with dedicated cutters Slower and more labor-intensive
Operator involvement Moderate, with defined steps High, with more room for inconsistency
Repeatability Good, when equipment is calibrated Variable between operators
Laboratory suitability Suitable for regular quality control testing Suitable only for rough, non-critical checks
Quality control use Widely used in structured QC programs Rarely sufficient for buyer compliance

The right setup ultimately depends on your laboratory’s testing volume, accuracy requirements, and the standards you need to comply with. A high-volume export unit will likely need dedicated GSM testing equipment, while a smaller operation might start with basic tools and scale up over time.

Types of Fabrics Tested Using a GSM Machine

GSM testing applies across a wide range of fabric types, including:

  • Cotton fabrics
  • Polyester and synthetic fabrics
  • Blended fabrics (cotton-poly, viscose blends, etc.)
  • Knitted fabrics
  • Woven fabrics
  • Nonwoven materials, where applicable
  • Garment-specific fabrics
  • Home textile materials like bedsheets and curtains

GSM ranges vary significantly depending on fabric construction, fiber type, and intended end use. A lightweight shirting fabric will naturally sit at a very different GSM than a heavy denim or upholstery fabric, so there’s no single “ideal” number — it’s always relative to what the fabric is designed for.

Factors That Can Affect Fabric GSM

Several variables can influence the final GSM reading, including:

  • Fibre composition and yarn count
  • Fabric construction (knit vs woven)
  • Ends and picks per inch in woven fabrics
  • Knitting structure and stitch density
  • Finishing processes like calendering or coating
  • Moisture content in the fabric
  • Fabric shrinkage after washing or processing
  • Location on the fabric roll where the sample was taken
  • Conditioning of the sample before testing
  • Overall measurement accuracy of the equipment used

Because so many factors can shift the result, testing conditions and sampling consistency matter just as much as the equipment itself. A well-calibrated GSM machine used with poor sampling practices will still produce unreliable results.

GSM Machine in Textile Quality Control

GSM testing plays a role at multiple checkpoints in the quality control process:

  • Incoming fabric inspection from suppliers
  • In-process quality checks during production
  • Final fabric inspection before cutting
  • Buyer compliance verification
  • Supplier performance evaluation
  • Batch-to-batch comparison
  • Ongoing production monitoring
  • Garment quality testing before shipment

Rather than relying on a single GSM reading, experienced quality teams track variation across multiple samples and batches over time. This helps identify whether a supplier is consistently within tolerance or whether a particular lot needs closer inspection.

How is GSM used in textile quality control? In textile quality control, GSM testing helps verify incoming fabric against specifications, monitor consistency across production batches, and confirm buyer compliance. Quality teams often track GSM trends across multiple samples rather than depending on a single test result.

How to Choose the Right GSM Machine

Selecting suitable GSM testing equipment depends on several practical factors:

  • Required measurement accuracy for your testing needs
  • Testing range suitable for your fabric types
  • Sample size requirements based on your standard procedure
  • Ease of operation for lab staff
  • Build quality and durability of the cutter and balance
  • Laboratory environment and available space
  • Calibration requirements and frequency
  • Repeatability of results over repeated use
  • Compatibility with your applicable testing standard
  • Availability of technical support and replacement parts
  • Expected testing volume in your facility

Rather than choosing based on price alone, it’s worth evaluating equipment against your actual testing requirements and the standards your buyers expect you to follow.

GSM Testing Standards and Laboratory Practices

GSM testing is typically carried out based on applicable international, national, or buyer-specific procedures. Different laboratories and buyers may reference different standards depending on the region, product category, or contractual requirement. Rather than assuming one procedure applies universally, it’s good laboratory practice to confirm which standard or buyer specification applies to a given order and to follow its current official version.

If your lab works with multiple buyers, it’s common to maintain records of which testing procedure was used for each order, since requirements can differ from one buyer to another.

Industries That Use GSM Testing

GSM testing is used widely across:

  • Textile manufacturing units
  • Garment manufacturing and export houses
  • Buying houses and sourcing agents
  • Fabric processing and finishing units
  • Independent textile testing laboratories
  • Home textile producers
  • Technical textile manufacturers
  • Quality inspection agencies

India has a strong and diverse textile manufacturing base, with clusters like Tiruppur known for knitwear and garment exports, and cities like Bangalore hosting a mix of textile manufacturers, buying houses, and testing laboratories. Across the broader textile industry — both in India and internationally — GSM testing remains one of the most routinely performed quality checks in fabric and garment production.

Common GSM Testing Mistakes

Even experienced labs can run into avoidable errors, such as:

  • Taking a sample that isn’t representative of the fabric roll
  • Cutting the specimen inaccurately or off-center
  • Using a weighing balance that isn’t properly calibrated
  • Skipping moisture or conditioning requirements when applicable
  • Not checking equipment condition before testing
  • Relying on only one reading instead of an average
  • Poor sample labeling and identification
  • Mixing different testing procedures within the same batch
  • Failing to maintain proper testing records

Consistent laboratory practices — calibrated equipment, trained staff, and clear documentation — go a long way toward improving the reliability of GSM results over time.

Why Choose Amith Garment Services

At Amith Garment Services, we supply GSM Machines, GSM Cutters, and a wider range of textile testing equipment designed to support fabric and garment quality workflows. Our product range includes GSM testing tools, Color Matching Cabinets, Crock Meters, Washing Fastness Testers, Fabric Inspection Machines, Bursting Strength Testers, and Fabric Rolling Machines, among other garment testing instruments.

We work with textile manufacturers, garment exporters, and testing laboratories to help them identify equipment suited to their specific testing requirements, lab environment, and applicable standards. Rather than pushing a one-size-fits-all solution, our approach is to understand what you’re testing, how often, and to what specification — and help you choose accordingly.

If you’re setting up a new fabric testing lab or upgrading existing GSM testing equipment, our team can walk you through the practical considerations involved.

Frequently Asked Questions

A GSM Machine is used to measure the weight of a fabric sample per square metre, helping textile manufacturers and quality teams verify whether fabric matches the required specification. It's commonly used during incoming fabric inspection, in-process quality checks, and final inspection before garments are cut and sewn. By providing a standardized, comparable weight value, a GSM Machine helps reduce guesswork and supports consistent decision-making across fabric batches, suppliers, and production orders.

A GSM Machine typically works by cutting a fabric specimen of a fixed, known area using a GSM cutter, then weighing that specimen on a precision balance. The recorded weight is then mathematically scaled up to represent a full square metre of fabric. This process gives a standardized GSM value that can be compared against buyer specifications or internal quality benchmarks, regardless of the actual size of the fabric roll being tested.

A GSM Cutter is a precision tool used specifically to cut a fabric specimen of a known, fixed area, while a GSM Machine or GSM Tester refers more broadly to the overall testing setup, which includes both the cutting tool and a weighing balance. In practice, both components work together — the cutter ensures a consistent sample size, and the balance provides an accurate weight reading needed to calculate the final GSM value.

Textile manufacturers test fabric GSM to confirm that production output matches agreed specifications, maintain consistency across batches, and avoid costly quality disputes with buyers. GSM directly influences fabric drape, durability, and garment appearance, so even small deviations can affect how a finished product performs. Regular GSM testing also supports better cost estimation, material planning, and long-term supplier evaluation within a textile quality control program.

A GSM Machine is used to measure fabric weight per square metre, helping textile labs check whether fabric meets buyer specifications and stays consistent across production batches.

You test fabric GSM by cutting a sample of known area, weighing it on a precise scale, and calculating the equivalent weight for one full square metre.

Fabric GSM matters because it affects cost, drape, durability, and how a garment feels and performs, making it a key quality check in textile production.

Choose a GSM testing machine based on your accuracy needs, testing volume, applicable standards, and how easily it fits into your existing lab workflow and calibration routine.

color matching cabinet

What Is a Color Matching Cabinet and How Does It Work?

Anyone who has compared a fabric swatch near a window in the morning and then again under office tube lights knows the shade never looks quite the same twice. That shift isn’t imagination — it’s a real optical phenomenon, and it’s one of the biggest headaches in textile production. A color matching cabinet solves this by giving quality teams one fixed, repeatable lighting setup so a colour decision made today matches the decision made next week, whether it’s checked in Bengaluru, Dhaka, or a buyer’s office in Europe.

Colour looks different under different light because light sources emit different wavelengths. A dye recipe that appears identical to a buyer’s standard under daylight can look slightly greenish under fluorescent light and slightly reddish under incandescent light. This effect, known as metamerism, is one of the most common causes of rejected fabric lots, reprocessing costs, and disputes between mills and buying houses. Since no factory or lab can control the weather or the time of day, textile manufacturers rely on artificial, standardized lighting instead — and that’s exactly what this equipment provides.

What Is a Color Matching Cabinet?

A color matching cabinet is a controlled-lighting viewing booth used in textile and garment quality control to evaluate and compare fabric colour under standardized artificial light sources instead of variable daylight or room lighting. It houses multiple lamp types — such as daylight, TL84, and UV — so that inspectors can view a sample under the exact same conditions every time, anywhere in the world.

Put simply, it’s a shading cabinet: an enclosed, neutral-grey interior lined with specific light sources, built so that stray light, wall colour, and ambient reflections don’t interfere with the assessment. Fabric swatches, lab dips, garment panels, and approved standards are placed side by side inside, and the inspector switches between light sources to check whether the shade holds up consistently. This is why the equipment is also referred to as a color matching box, color matching light box, or simply a textile color matching cabinet — the terms are used interchangeably across mills and labs.

Viewing fabric under uncontrolled room lighting is unreliable because ordinary tube lights, LED panels, and daylight through a window all have different colour temperatures and spectral compositions. A shade that passes inspection under one type of light might fail under another, which is exactly the kind of inconsistency a fabric color matching cabinet is designed to eliminate.

Why Is a Color Matching Cabinet Important in Textile Testing?

Colour is often the first thing a buyer notices, and it’s also one of the most common reasons for rejection at the inspection stage. A color assessment cabinet matters in textile testing because it removes guesswork from decisions that directly affect production cost and buyer relationships. Here’s where it plays a role:

  • Fabric colour approval – Lab dips and bulk production samples are checked against an approved standard before dyeing continues at scale.
  • Shade matching – Panels cut from different rolls or dye lots are compared to confirm they fall within an acceptable tolerance.
  • Production consistency – Repeated checks across shifts and batches use the same lighting, so results aren’t influenced by the time of day.
  • Buyer approvals – Many international buyers specify the exact light source (often D65) their vendors must use, and a textile color matching cabinet ensures the factory can meet that requirement precisely.
  • Garment quality testing – Finished garment panels, trims, and accessories are checked together to confirm they match as a set.
  • Dyeing quality control – Dye house teams use it to catch shade variation early, before an entire lot is processed incorrectly.
  • Fabric color assessment across suppliers – When fabric arrives from multiple vendors, the cabinet gives a common reference point for comparison.
  • Textile color inspection at multiple production stages – from greige to finished fabric to cut panels.

Without this kind of controlled environment, two equally experienced inspectors could reach different conclusions about the same fabric simply because one checked it near a window and the other under a ceiling light.

Color Matching Cabinet Working Principle

The color matching cabinet working principle is straightforward once you understand what it’s trying to solve. The cabinet houses several individually switchable light sources, each simulating a specific real-world lighting condition:

  • D65 – Simulates average daylight; the most commonly specified reference for international buyers.
  • TL84 – Simulates fluorescent lighting typically found in European retail stores.
  • CWF (Cool White Fluorescent) – Common in North American retail environments.
  • UV (Ultraviolet) – Detects optical brighteners or whitening agents used in fabric finishing.
  • Incandescent (A) – Simulates warm household lighting.
  • Horizon light / TL83 in some models, for additional retail simulation.

The interior walls are typically finished in a neutral grey to avoid any colour bias reflecting onto the sample. The inspector places the fabric or garment sample alongside the approved standard, closes the cabinet to block external light, and switches between light sources one at a time. If the shade matches consistently across all the specified lights, it’s considered a stable match. If the colour shifts noticeably under one or more sources, that’s metamerism showing up — and it flags a real risk that the same fabric could look mismatched once it reaches the buyer’s store under different lighting.

This is the basic operating logic behind every textile color matching machine on the market, regardless of brand or cabinet size, and it’s the same principle taught in most textile quality control training programs.

Standard Light Sources Used for Color Matching

Every reputable standard light source for color matching used in these cabinets follows internationally recognized illuminant standards, largely based on CIE (International Commission on Illumination) definitions. Buyers and certification bodies usually specify which combination of lights a supplier must check against — commonly D65 plus TL84, with UV used separately to detect brightening agents. Using the correct, calibrated light source matters just as much as using the cabinet itself; a poorly calibrated or aging lamp can quietly throw off every assessment made under it, which is why periodic lamp replacement and calibration checks are part of standard lab maintenance.

Where Color Matching Cabinets Are Used in the Textile Industry

The use of a color matching cabinet in textile industry settings spans the entire supply chain:

  • Textile mills and dye houses – checking lab dips against approved standards before bulk dyeing
  • Garment manufacturing units – matching fabric, thread, buttons, zippers, and trims as a complete set
  • Buying houses and merchandising offices – verifying supplier samples before forwarding approval to the buyer
  • Textile testing laboratories – running formal colour fastness and shade comparison tests
  • Quality control departments – conducting routine inline and end-line inspections
  • Export houses – confirming shipment-ready goods meet the buyer’s specified colour tolerance

This wide range of use is one reason visual color matching remains a standard practice even in facilities that also use spectrophotometers for numerical colour measurement — the human eye, under correct lighting, is still the final check before goods are approved.

Visual Color Matching vs. Instrumental Color Measurement

It’s worth noting that a color matching cabinet supports visual assessment, while a spectrophotometer provides numerical, instrument-based colour data (values like L*, a*, b*, and Delta E). The two methods complement each other rather than replace one another. Instrumental measurement is useful for objective, repeatable data, but many buyers still require final sign-off through visual inspection under standardized light, since that reflects how the product will actually be judged by end customers in a retail setting. A well-run quality department typically uses both: instrumental data to catch deviations early, and the cabinet for final human approval.

Choosing the Right Color Matching Equipment

When selecting color matching equipment for a lab or production floor, a few practical factors matter more than brand names:

  • Number and type of light sources included, matched to your buyers’ requirements
  • Cabinet size, based on whether you’re checking swatches, full garment panels, or large fabric rolls
  • Build quality of the interior lining, since colour-neutral walls are essential for accurate results
  • Lamp availability for replacement, since consistent recalibration keeps results reliable over time
  • Ease of switching between light sources during inspection

Getting this right the first time avoids the common problem of a factory investing in a cabinet that doesn’t match the light sources its buyers actually specify.

Conclusion

A color matching cabinet isn’t a luxury item in a textile lab — it’s the equipment that keeps colour decisions consistent across shifts, teams, and continents. By replacing unpredictable daylight and mixed room lighting with standardized artificial sources, it takes the guesswork out of shade approval and helps catch metamerism before it becomes an expensive rejection at the buyer’s end. Whether it’s called a color matching box, a color matching light cabinet, or a fabric color matching cabinet, its job stays the same: give inspectors one reliable, repeatable way to judge colour, every single time.

Frequently Asked Questions

A color matching cabinet is used to evaluate and compare fabric or garment colour under standardized artificial light sources, helping textile professionals confirm shade accuracy before production or shipment approval.

D65, which simulates average daylight, is the most widely specified standard light source for color matching, often used alongside TL84 and UV depending on the buyer's requirements.

This happens due to metamerism, where two colours that appear to match under one light source look different under another because of differences in their spectral reflectance.

No. A color matching cabinet supports visual color matching under controlled lighting, while a spectrophotometer measures colour numerically. Many textile labs use both together for complete quality control.

Lamps degrade with use and should be checked and replaced periodically, typically as recommended by the manufacturer, since an aging lamp can distort colour assessment results even if it still lights up normally.

It ensures fabric color assessment, textile color inspection, and shade approvals are done consistently, reducing disputes between mills, garment manufacturers, and buyers over colour mismatches.

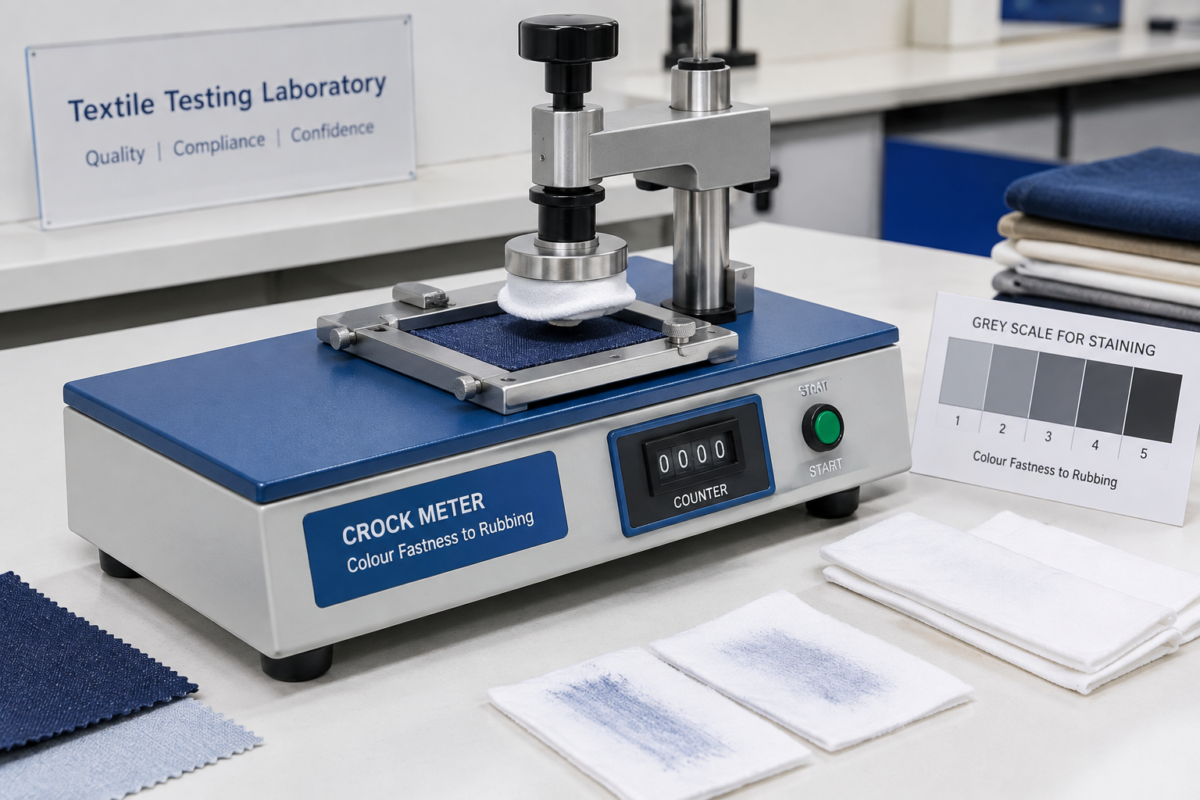
Crock Meter instrument used for colour fastness to rubbing testing in a textile lab

What Is a Crock Meter? Working Principle, Testing Procedure & Applications in Textile Testing

When a dyed fabric rubs against another surface — a car seat, a pair of hands, another garment in a suitcase — some of that colour can transfer. Anyone who has picked up a new pair of dark jeans and noticed blue staining on their palms has seen this happen firsthand. In a textile lab, this behaviour is measured with a Crock Meter, an instrument built specifically to test colour fastness to rubbing under controlled, repeatable conditions. Before a fabric or garment is approved for production or shipped to a buyer, this test tells a mill or exporter whether the colour will hold up to everyday handling — or end up as a customer complaint.

What Is a Crock Meter?

A Crock Meter is a testing instrument used to evaluate how much colour transfers from a dyed or printed textile onto another surface when the two are rubbed together. In textile terminology, this transfer of colour is called “crocking,” and the property being measured is colour fastness to rubbing.

Rather than rubbing fabric by hand — which varies from person to person and can’t be repeated the same way twice — a Crockmeter applies a fixed rubbing motion, using a set pressure and a defined number of strokes, so that results from one test can be reliably compared to another. The test involves rubbing a piece of standard white cotton test cloth against the specimen fabric, then assessing how much colour has transferred onto that white cloth.

What is a Crock Meter? 

A Crock Meter is a textile testing instrument that measures colour fastness to rubbing. It rubs a specimen fabric against a standard white test cloth under controlled pressure and motion, then the amount of colour transferred onto the cloth is assessed to judge how well a fabric’s dye resists rubbing off during normal handling.

Why Is Crock Meter Testing Important?

Colour transfer isn’t just a cosmetic issue — it affects how a product performs after it leaves the factory. A Crock Meter test gives quality teams a concrete, repeatable way to check this before goods are shipped.

This matters across several stages of production:

  • Dyeing and finishing — confirming that a dye has been properly fixed before fabric moves to cutting and stitching
  • Fabric quality control — screening incoming fabric lots before they’re approved for garment production
  • Garment quality testing — checking finished garments, especially dark or heavily dyed pieces, before packing
  • Export quality requirements — many international buyers specify minimum rubbing fastness ratings as part of their technical package
  • Production quality control — catching problems on the line rather than after a shipment has reached the customer

The consequences show up in familiar ways. Dark denim can leave blue marks on light-coloured seating or on hands during wear. Deeply dyed garments packed tightly for export can stain neighbouring lighter items in the same carton. Even light-coloured fabrics with poor pigment fixation can shed onto skin during repeated handling. Upholstery fabric that crocks can transfer colour onto clothing every time someone sits down. In each of these cases, a Crock Meter test run during development or before shipment is what catches the problem while it’s still fixable.

Why is colour fastness to rubbing important? 

Colour fastness to rubbing is important because it predicts whether a fabric’s dye will transfer onto other surfaces during normal handling, washing, or wear. Poor rubbing fastness leads to stained skin, garments, or upholstery, and often results in buyer rejections, returns, or complaints after a product has already shipped.

Crockmeter Working Principle

The Crockmeter working principle is built around consistency — the same rubbing action, applied the same way, every time a test is run.

  1. Specimen preparation — a sample of the fabric under test is cut to the size required by the applicable test method and conditioned as specified.
  2. Mounting the specimen — the fabric is secured flat on the testing base of the instrument, without folds or wrinkles that could affect contact.
  3. Preparing the rubbing material — a standard white test cloth is attached to the rubbing finger of the machine.
  4. Positioning the rubbing finger — the finger, wrapped with the test cloth, is lowered onto the specimen under a defined load.
  5. Applying controlled rubbing action — the machine moves the finger back and forth over the fabric for a set number of strokes at a consistent speed.
  6. Dry rubbing conditions — for the dry test, the white test cloth is used as-is, without moisture.
  7. Wet rubbing conditions — for the wet test, the test cloth is moistened according to the method before rubbing begins.
  8. Removing the rubbing cloth — once the cycle is complete, the test cloth is removed and, for wet tests, allowed to dry under the conditions specified.
  9. Assessing colour transfer — the stained test cloth is evaluated against a grey scale or other specified method to rate the degree of staining.

Because the pressure, stroke length, and stroke count stay the same from one test to the next, results become comparable across different fabrics, different operators, and even different labs — which is the whole point of using an instrument instead of a hand-rub.

Crock Meter Testing Procedure

Step 1: Prepare the Fabric Specimen

The fabric sample is cut and conditioned according to the applicable test method before testing begins, so that moisture and temperature don’t skew the result.

Step 2: Prepare the Rubbing Cloth

A standard white cotton rubbing cloth is used as the receiving surface. Its role is to give a neutral, consistent material against which colour transfer can be judged — using anything else would make results inconsistent between labs.

Step 3: Mount the Specimen

The specimen is clamped flat onto the testing base so it doesn’t shift or lift during rubbing, which could otherwise distort the amount of contact and pressure applied.

Step 4: Perform the Rubbing Test

The rubbing finger, loaded with the test cloth, moves across the specimen in a controlled back-and-forth motion for the number of cycles specified by the test method.

Step 5: Conduct Dry or Wet Rubbing

Depending on whether the buyer specification or standard calls for a dry rubbing test or a wet rubbing test, the rubbing cloth is used dry, or moistened beforehand as per the method.

Step 6: Evaluate Colour Transfer

Once rubbing is complete, the test cloth is assessed for staining, typically using a grey scale for staining, and the result is recorded as a rating.

The exact specimen dimensions, number of rubbing cycles, applied load, conditioning time, and evaluation method should always follow the specific standard and any customer specification in use — these details vary between test methods and should never be assumed.

Dry Rubbing Test vs Wet Rubbing Test

Parameter Dry Rubbing Test Wet Rubbing Test
Rubbing material Dry Moistened according to the test method
Test condition Dry Wet
Main purpose Assess colour transfer under dry rubbing Assess colour transfer under wet rubbing
Typical application General textile and garment testing Products where moisture exposure is relevant
Result assessment Staining/colour transfer assessment Staining/colour transfer assessment
Equipment Crock Meter Crock Meter

The dry rubbing test simulates everyday contact — handling, folding, sitting, general wear — where no moisture is involved. It’s the baseline test run on nearly every dyed or printed fabric.

The wet rubbing test simulates situations where moisture is present, such as perspiration during wear, contact with damp surfaces, or exposure during washing and handling while still damp. Because moisture tends to make dyes more mobile, wet rubbing fastness ratings are often lower than dry ratings for the same fabric — which is exactly why both tests exist and are usually run together.

What is the difference between dry rubbing and wet rubbing tests? 

A dry rubbing test uses a dry white test cloth to check colour transfer under normal, moisture-free contact. A wet rubbing test moistens the test cloth beforehand to check how the fabric performs when contact happens in damp conditions. Wet results are often lower because moisture increases dye mobility.

International Standards for Crock Meter Testing

Crock Meter testing is carried out against recognized international test methods, and it’s important to know which one applies to a given order.

ISO 105-X12 is an international textile test method covering colour fastness to rubbing. It’s widely referenced by buyers and labs working to ISO-based specifications.

AATCC 8 is a recognized AATCC test method for colourfastness to crocking, commonly specified by buyers and mills working within the North American market or AATCC-based specification systems.

Rather than assuming one standard fits every order, textile laboratories should confirm which method — and which edition of that method — applies based on the buyer’s technical package, the product category, and the market the goods are destined for. Standards are periodically revised, so labs should always work from the current applicable edition rather than an older copy on file.

Which standard is used for Crock Meter testing? 

Crock Meter testing is commonly carried out to ISO 105-X12 or AATCC 8, depending on the buyer, market, and product specification. There isn’t a single universal standard — the applicable method should be confirmed with the customer or based on the destination market before testing begins.

Applications of a Crock Meter in Textile Testing

A Crock Meter is used across a wide range of textile categories, including cotton fabrics, denim, knitted fabrics, woven fabrics, dyed fabrics, printed fabrics, finished garments, home textiles, upholstery fabric, workwear, fashion textiles, and technical textiles.

In India’s textile and garment manufacturing hubs — including centres like Bangalore and Tiruppur — Crock Meter testing is a routine part of quality control for both domestic production and export-oriented manufacturing. Garment exporters use it to confirm that dyed and printed fabrics meet buyer specifications before cutting begins, while in-house textile labs use it during dyeing and finishing development to catch fastness problems early, before a bulk batch is committed.

Factors Affecting Fabric Rubbing Fastness

Rubbing fastness isn’t determined by one single variable — it depends on how several factors interact in a specific fabric and dyeing process:

  • Dye type and dye class used
  • Dye concentration and shade depth
  • Degree of dye fixation achieved during processing
  • Fabric construction (weave or knit structure)
  • Fabric surface characteristics
  • Moisture present on the fabric or test cloth
  • Finishing treatments applied after dyeing
  • Washing-off process following dyeing or printing
  • Surface deposits, such as unfixed dye or finishing chemicals
  • Printing method used, for printed fabrics
  • The rubbing conditions themselves, including pressure and cycles

Poor rubbing fastness in one fabric might trace back to incomplete washing-off after dyeing, while in another it could stem from the printing binder used, or the fibre’s natural affinity for the dye class selected. The cause is specific to the material and process, which is why root-cause investigation matters more than assuming a single fix applies everywhere.

How to Improve Fabric Rubbing Fastness

Improving rubbing fastness usually starts upstream, in the dyeing and finishing stages, rather than at the point of testing:

  • Selecting dyes appropriate for the fibre type and end use
  • Ensuring proper dye fixation during and after dyeing
  • Optimizing dyeing conditions such as time, temperature, and liquor ratio
  • Carrying out thorough washing-off to remove unfixed dye
  • Choosing finishing processes that don’t compromise fastness
  • Controlling production parameters consistently across batches
  • Testing during product development, not just at final inspection
  • Testing production batches at regular intervals, not only samples
  • Investigating any poor result before goods are approved for shipment

The right corrective action depends on the fibre, the dye class in use, the fabric construction, the finishing process applied, and the specific production conditions on the floor — a fix that works for one mill’s process may not apply directly to another’s.

Choosing the Right Crock Meter Machine

For labs or manufacturers evaluating a Crock Meter machine purchase, a few practical points are worth checking before deciding:

  • Whether the machine supports the testing standards your buyers or market require
  • Dry and wet rubbing capability in a single unit
  • Consistency of the controlled rubbing action across repeated tests
  • Build quality and long-term durability for daily lab use
  • Ease of mounting specimens and rubbing cloth
  • Repeatability of results across operators
  • Fit with your lab’s existing testing workflow
  • Calibration and verification requirements over the equipment’s life
  • Availability of technical support after installation
  • Access to spare parts when components wear out
  • Installation and service support from the supplier
  • The supplier’s experience specifically with textile testing instruments

For labs sourcing locally, working with an established Crockmeter manufacturer in India or a Crockmeter supplier in Bangalore can simplify installation, calibration support, and access to spares — factors that matter more over the equipment’s working life than at the time of purchase alone.

Why Choose Amith Garment Services?

Amith Garment Services supplies textile and garment testing equipment to laboratories, manufacturers, and exporters working across India’s textile industry. Our focus is on helping labs select equipment that actually fits their testing requirements — whether that’s a Crock Meter for rubbing fastness, a Light Booth for shade evaluation, or a Colour Matching Cabinet for visual assessment under controlled lighting.

We work with customers to understand the standards they test against, the product categories they handle, and the specification requirements set by their buyers, so equipment recommendations are grounded in actual lab needs rather than generic sales pitches. Beyond the initial purchase, we support installation and provide technical assistance so labs can keep testing running smoothly as part of their day-to-day quality control.

```html

Frequently Asked Questions

A Crock Meter is used to test colour fastness to rubbing on dyed, printed, or finished textiles. It helps labs and manufacturers determine whether colour will transfer from a fabric onto another surface during normal handling, wear, or washing. This is especially important for dark or heavily dyed fabrics like denim, where colour transfer onto skin or lighter garments is a common complaint. The test is run at multiple production stages, including fabric approval, garment quality checks, and pre-shipment inspection, to catch issues before goods reach the customer.

The fabric specimen is conditioned and mounted on the instrument's testing base. A standard white test cloth is attached to the rubbing finger, which is then lowered onto the specimen under a fixed load. The machine performs a set number of controlled back-and-forth rubbing strokes. Depending on whether a dry or wet rubbing test is required, the test cloth is used dry or moistened beforehand. After rubbing, the test cloth is assessed for staining, typically using a grey scale, and the result is recorded according to the applicable standard.

A dry rubbing test uses a dry white test cloth to check how a fabric behaves under normal, moisture-free contact, such as handling or everyday wear. A wet rubbing test moistens the test cloth beforehand, simulating contact under damp conditions like perspiration or exposure to moisture. Because dye tends to become more mobile when wet, wet rubbing fastness results are often lower than dry results for the same fabric. Both tests are commonly run together to give a complete picture of a fabric's rubbing fastness performance.

Crock Meter testing is commonly carried out to methods such as ISO 105-X12, an international standard for colour fastness to rubbing, or AATCC 8, an AATCC method for colourfastness to crocking. The correct standard to use depends on the buyer's technical specification, the destination market, and the product category involved. Since standards are periodically revised, textile laboratories should always confirm they are working from the current applicable edition rather than assuming one method applies universally to every order.

```
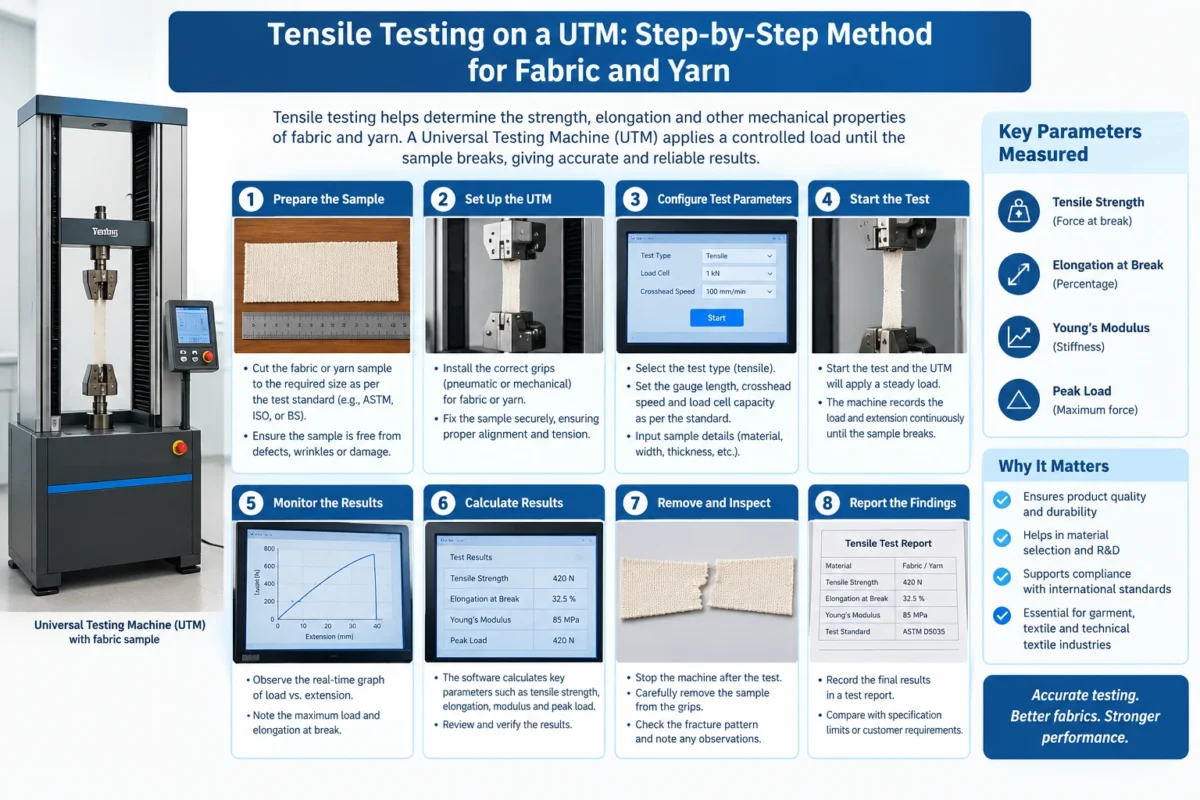
Tensile Testing on a UTM: Step-by-Step Method for Fabric and Yarn

Tensile Testing on a UTM: Step-by-Step Method for Fabric and Yarn

If you’ve spent any time on a textile testing floor, you already know that a fabric or yarn can look perfectly fine and still fail under load. That’s exactly why a universal testing machine tensile test exists — it tells you, in numbers, how much force a material can take before it gives way. For manufacturers, exporters, and testing labs across India’s textile hubs, this single test often decides whether a lot gets shipped or gets rejected.

This article walks through how tensile testing actually works on a Universal Testing Machine (UTM), what happens at each stage of the process, and the practical details that separate a reliable test from a questionable one.

What Is a Universal Testing Machine Tensile Test?

A universal testing machine tensile test measures how a material behaves when it is stretched until it breaks. The machine applies a steadily increasing pulling force to a fabric or yarn specimen while recording the force and the amount of stretch (elongation) at every point until failure.

A universal testing machine tensile test applies a controlled pulling force to a fabric or yarn sample until it breaks, while measuring breaking force and elongation. It helps determine how strong a material is and whether it meets required quality or export standards.

The term “universal” comes from the machine’s ability to perform more than one type of mechanical test — tension, and in many configurations, compression or bursting-related tests — depending on the fixtures fitted to it. For textile applications, the tensile mode is what’s used most often, since it directly reflects how a fabric or yarn will perform under real handling and wear.

Why Is Tensile Testing Important for Fabric and Yarn?

Textile products go through constant mechanical stress — stitching, washing, stretching during wear, and handling during manufacturing. A fabric that tears too easily or a yarn that snaps during weaving creates costly problems downstream.

Tensile testing is important because it predicts how fabric or yarn will hold up during manufacturing, washing, and everyday use. It helps identify weak batches before they reach production, reducing rejections, returns, and quality complaints from buyers.

Some practical reasons this test matters:

  • It confirms whether incoming fabric or yarn meets buyer specifications before cutting or weaving begins.
  • It flags inconsistencies between lots from the same supplier.
  • It supports compliance documentation for garment exporters and buying houses.
  • It helps quality managers catch process issues, such as poor yarn twist or uneven fabric construction, early.

How Does a Universal Testing Machine Work for Textiles?

At its core, a UTM has a fixed lower grip and a moving upper grip (the crosshead), driven by a motor. The specimen is clamped between the two grips. As the crosshead moves upward at a controlled speed, it stretches the specimen while a load cell continuously measures the resisting force.

This data is plotted as a force-extension curve, which shows how the material responds at every stage — from initial stretch, through any yielding, up to the point of complete failure. The gauge length (the distance between the grips at the start of the test) and the test speed are both set according to the applicable standard and material type, since these directly influence the recorded values.

Tensile Testing on a UTM: Step-by-Step Method

1. Prepare the UTM and Test Accessories

Before any specimen is loaded, the machine should be checked and calibrated as per laboratory protocol. The correct load cell capacity and grips — flat jaws for fabric, capstan or specific yarn grips for yarn — need to be fitted based on the material being tested.

2. Select and Prepare the Specimen

Specimens are cut or drawn according to the applicable test standard, taking care to avoid folds, creases, or visible defects that could distort results. For fabric, samples are typically taken in both warp and weft directions; for yarn, individual strands are prepared without unnecessary handling that could alter twist or tension.

3. Set the Test Parameters

Gauge length, test speed, and pre-tension (if applicable) are entered into the UTM’s software or control panel. These parameters depend entirely on the standard being followed and the material category — they are not one-size-fits-all settings.

4. Mount the Fabric or Yarn Specimen

The specimen is clamped centrally and squarely in the grips. Correct gripping is critical — if the specimen is angled, loose, or unevenly tensioned, the results will not reflect the material’s true strength.

5. Start the Tensile Test

Once mounted, the test is started, and the crosshead begins to move at the set speed, applying continuous tension until the specimen breaks or reaches the defined end condition.

6. Record Breaking Force and Elongation

The UTM logs the breaking force (the peak load recorded before failure) and the elongation at break (how much the specimen stretched at that point). Both values are captured automatically by the software in most modern machines.

7. Analyze and Report the Results

The force-extension curve is reviewed to check whether the specimen broke cleanly within the gauge area or slipped/failed at the grips — a slip invalidates the reading. Multiple repeat specimens are tested, and the results are averaged and reported alongside the standard followed.

UTM Tensile Testing for Fabric

Fabric tensile testing brings its own set of practical considerations. Fabric is tested separately in the warp and weft directions because woven fabrics are rarely equally strong in both directions — yarn density, weave pattern, and finishing processes all affect this.

Key points for fabric tensile testing:

  • Specimen preparation must follow the applicable standard for width, length, and edge treatment (raveled or cut strip).
  • Grip selection and jaw pressure need to be appropriate for the fabric’s thickness and surface — too little pressure causes slippage, too much can damage the yarns at the grip line.
  • Fabric construction — woven, knitted, or nonwoven — changes how the material stretches; knitted fabrics generally show much higher elongation than woven fabrics due to their loop structure.
  • Where seams are part of the test setup, it should be noted whether failure occurred at the seam or in the fabric itself, since this changes what the result actually tells you.
  • Repeat testing across multiple specimens per direction gives a more reliable average than relying on a single reading.

UTM Tensile Testing for Yarn

Yarn tensile testing follows a different logic because yarn is a much finer, more flexible specimen than fabric.

Important factors include:

  • Yarn count and construction — finer yarns naturally register lower breaking force than coarser ones, so results are usually interpreted alongside count.
  • Twist level influences both strength and elongation; too little or too much twist relative to the yarn’s design can show up clearly in test results.
  • Grip selection matters even more here, since yarn is prone to slippage at the jaws if the wrong grip type or pressure is used.
  • The location of yarn break is worth noting — a break near the grip often signals a gripping problem rather than a true material weakness.
  • Result consistency across repeat measurements is essential, since yarn is more variable along its length than fabric.

These results feed directly into decisions made during spinning, weaving, knitting, and downstream garment manufacturing, where yarn strength affects both process efficiency and final product performance.

Fabric Tensile Testing vs Yarn Tensile Testing

Aspect Fabric Tensile Testing Yarn Tensile Testing
Specimen form Strip or grab sample of fabric Single yarn strand
Test directions Warp and weft Along the yarn axis only
Common grip type Flat rubber-faced jaws Capstan or specialized yarn grips
Key influencing factor Weave/knit construction Yarn count and twist
Typical failure point Within gauge length or at seam Within gauge length or near grip
Primary use Fabric strength, garment quality Spinning and weaving process control

Important Test Parameters in Textile Tensile Testing

Several parameters influence the outcome of a tensile test, and each should be set according to the applicable standard rather than assumed:

  • Gauge length – the initial distance between grips.
  • Test speed – the rate at which the crosshead moves.
  • Pre-tension – the small initial tension applied before the test begins, used for some yarn methods.
  • Conditioning – textiles are sensitive to humidity and temperature, so specimens are often conditioned in a controlled atmosphere before testing to get comparable results.

International Standards for Textile Tensile Testing

Textile tensile testing is generally carried out with reference to internationally recognized standards, including:

  • ISO 13934-1 – Tensile properties of fabrics using the strip method
  • ISO 13934-2 – Tensile properties of fabrics using the grab method
  • ISO 2062 – Determination of single-end breaking force and elongation at break for yarn
  • ASTM D5034 – Breaking strength and elongation of textile fabrics (grab test)
  • ASTM D5035 – Breaking force and elongation of textile fabrics (strip method)

The exact specimen dimensions, gauge length, test speed, conditioning requirements, and reporting format vary between these standards and depend on the material being tested. Laboratories should always refer to the latest edition of the applicable standard rather than relying on general guidance alone.

Factors That Affect Tensile Test Results

Even with a well-calibrated UTM, results can vary due to avoidable errors:

  • Specimen slippage at the grips, which lowers the apparent breaking force
  • Incorrect gripping or misaligned clamping, causing uneven load distribution
  • Machine misalignment, which introduces bending stress instead of pure tension
  • Inconsistent conditioning, since humidity changes fabric and yarn properties
  • Wrong test direction, especially confusing warp and weft on anisotropic fabrics
  • Calibration drift in the load cell or crosshead speed
  • Incorrect test parameters entered for the material or standard
  • Operator handling during specimen preparation and mounting
  • Insufficient repeat testing, leading to results based on a single unrepresentative sample

How to Improve Textile Tensile Testing Accuracy

Improving accuracy comes down to discipline in the basics rather than expensive upgrades:

  • Calibrate the UTM and load cell on a regular schedule
  • Condition specimens as specified before testing
  • Use the correct grip type and jaw pressure for the material
  • Align specimens carefully and consistently
  • Follow the exact parameters specified in the chosen standard
  • Test enough repeat specimens to get a statistically meaningful average
  • Document any slippage, grip failure, or abnormal breaks separately from valid results

Choosing the Right Universal Testing Machine for Textiles

When evaluating a Universal Testing Machine for textiles, labs typically look at the range of load cells available, the variety of grips and fixtures that can be fitted, software capability for recording force-extension curves, and ease of switching between fabric and yarn testing setups. The right choice depends on the range of materials a lab regularly tests and the standards it needs to comply with.

Industries That Use UTM Tensile Testing

Tensile testing on a UTM is used well beyond a single sector:

  • Textile manufacturing units checking incoming raw material and in-process fabric
  • Garment factories verifying fabric strength before cutting
  • Textile exporters meeting buyer and compliance requirements
  • Textile testing laboratories offering independent verification services
  • Buying houses conducting pre-shipment quality checks
  • Technical textile and nonwoven producers checking material performance for specialized applications

Textile clusters such as Tiruppur and other manufacturing regions across India rely heavily on this kind of testing to maintain consistent quality for both domestic and export markets.

Why Choose Amith Garment Services

Amith Garment Services works with textile manufacturers, garment exporters, testing laboratories, and quality control teams who need dependable Textile Testing Equipment for day-to-day fabric and yarn evaluation. Alongside Universal Testing Machines, the range of Textile Laboratory Equipment supports broader quality control needs — from colour fastness to fabric inspection — helping labs build a complete, standards-based testing setup suited to their specific product range.

Conclusion

A universal testing machine tensile test remains one of the most direct ways to verify how a fabric or yarn will actually perform once it leaves the lab. Getting reliable results depends less on the machine alone and more on consistent specimen preparation, correct gripping, proper conditioning, and adherence to the relevant standard. For manufacturers, exporters, and testing labs working to consistent quality benchmarks, a properly selected and well-maintained UTM, used with disciplined testing practices, remains central to dependable textile quality control.

Frequently Asked Questions

A universal testing machine tensile test is a laboratory procedure where a fabric or yarn specimen is stretched under controlled conditions until it breaks. The machine records the breaking force and elongation throughout the process. This data helps textile manufacturers, exporters, and testing labs verify whether a material meets required strength specifications before it moves further into production or shipment.

Yes, a single UTM can test both fabric and yarn, provided it is fitted with the correct grips and load cell for each material type. Fabric typically requires flat jaw grips, while yarn testing often uses capstan or specialized grips to reduce slippage. The test parameters, such as gauge length and speed, are also adjusted according to the material and applicable standard.

During textile tensile testing, the two primary measurements are breaking force and elongation at break. Breaking force shows the maximum load the specimen withstood, while elongation shows how much it stretched before failing. Together, these values are plotted as a force-extension curve, which gives a fuller picture of how the material behaves under increasing tension.

Specimen preparation directly affects the reliability of tensile test results. Incorrect cutting, damaged edges, improper conditioning, or inconsistent handling can all distort the breaking force and elongation values recorded. Careful preparation, following the relevant standard, ensures that the universal testing machine tensile test reflects the true strength of the fabric or yarn rather than an error introduced during setup.

It's used to check how strong a fabric or yarn is by pulling it until it breaks and measuring the force and stretch involved, which helps confirm quality before manufacturing or export.

You cut fabric strips in the warp and weft directions, clamp them into the UTM's grips, and stretch them at a set speed until they break, recording the force and stretch at that point.

A yarn strand is clamped carefully to avoid slipping, then stretched at a controlled speed until it snaps, with the machine recording the breaking force and elongation.

It means how much a fabric or yarn stretches, as a percentage of its original length, right before it breaks during the tensile test.

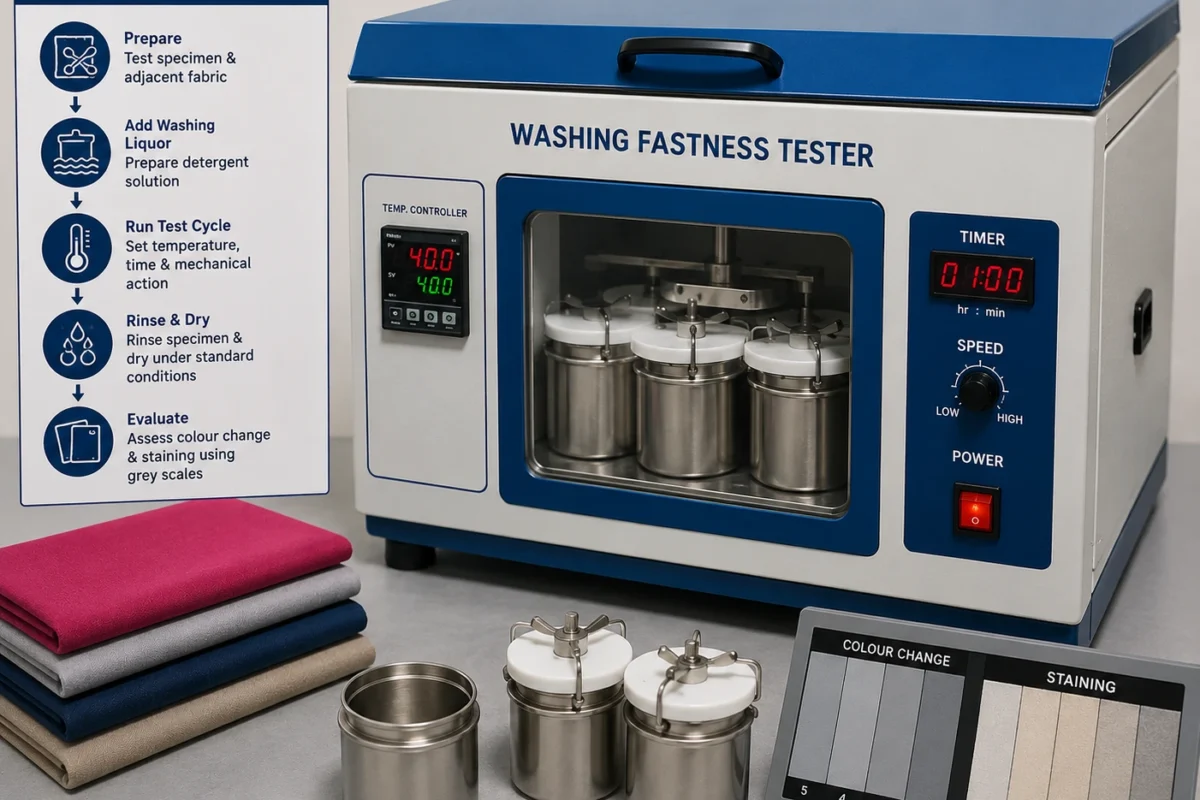
washing fastness tester

Washing Fastness Tester: Working Principle, Procedure, Standards & Applications

When a customer buys a shirt, a bedsheet, or a school uniform, the last thing they expect is for the colour to bleed or fade after the first few washes. Yet this is one of the most common quality complaints textile manufacturers and garment exporters deal with. Colour durability during laundering is not a minor detail — it directly affects buyer satisfaction, brand reputation, and whether a shipment gets accepted or rejected at inspection.

This is where a washing fastness tester becomes essential. It is a laboratory instrument used to simulate domestic or industrial washing conditions on a small fabric specimen, so that colour change and staining can be assessed before the fabric or garment goes into bulk production. For textile manufacturers, garment exporters, testing laboratories, and quality-control teams, this single test can prevent costly rework, disputes with buyers, and returned shipments.

In this article, we’ll walk through what a washing fastness tester is, how it works, the general testing procedure, the standards commonly referenced, and where this equipment is used across the textile and garment industry.

What Is a Washing Fastness Tester?

A washing fastness tester is a piece of textile testing equipment designed to evaluate how well a dyed or printed fabric holds its colour when subjected to controlled washing conditions. It’s used across textile testing laboratories, garment factories, and buying-house inspection units to check Colour Fastness to Washing — essentially, how resistant a fabric’s colour is to laundering.

The instrument typically works by placing fabric specimens, along with an adjacent (multi-fibre) fabric, inside sealed containers along with a washing liquor. These containers are then rotated at a controlled temperature for a specified duration, replicating the mechanical and chemical stress of an actual wash cycle.

Two main properties are evaluated after the test:

  • Colour change in the original specimen
  • Staining on the adjacent fabric

Because even small variations in temperature, time, or agitation can change the outcome, controlled laboratory conditions are critical. A washing fastness tester allows this consistency, which is something a normal washing machine simply cannot guarantee.

What is a washing fastness tester?
A washing fastness tester is a laboratory instrument that evaluates how well a dyed fabric retains its colour when washed under controlled conditions. It measures colour change in the specimen and staining on an adjacent fabric, helping textile and garment manufacturers assess Colour Fastness to Washing before production.

Why Is Washing Fastness Testing Important?

Washing fastness testing matters across almost every category of textile product — garments, dyed fabrics, home textiles, apparel, uniforms, children’s clothing, workwear, and export-bound products. Each of these goes through repeated washing during its usable life, and the colour is expected to hold up reasonably well throughout.

Poor washing fastness can lead to several downstream issues:

  • Noticeable colour fading after a few wash cycles
  • Colour transfer onto skin or other garments
  • Staining of adjacent fabrics in a mixed laundry load
  • Customer complaints and returns
  • Rejection of bulk shipments during buyer inspection
  • Repeated quality-control failures that slow down production timelines

For garment exporters in particular, many international buyers specify a minimum fastness rating as part of their technical package. Failing to meet that rating, even by a small margin, can result in an entire consignment being put on hold.

Why is washing fastness important?
Washing fastness testing is important because it predicts how a fabric’s colour will behave after repeated laundering. Without it, manufacturers risk colour fading, staining of other garments, buyer rejection, and customer complaints — issues that are far more expensive to fix after production than before it.

How Does a Washing Fastness Tester Work?

The working principle behind a washing fastness tester is based on simulating a wash cycle under repeatable, measurable conditions. While exact parameters vary by standard, the general sequence looks like this:

  1. Preparation of the textile specimen — a fabric sample is cut to the required size.
  2. Selection of adjacent fabric — a multi-fibre or single-fibre fabric is chosen based on the applicable test method.
  3. Preparation of washing liquor — water is prepared at the specified concentration and, where required, combined with detergent or soap.
  4. Addition of detergent or soap — added only where the applicable standard calls for it.
  5. Loading the specimen — the specimen and adjacent fabric are sewn together and placed into the test container along with steel balls, if specified.
  6. Controlled washing conditions — the container is sealed and placed into the instrument.
  7. Temperature control — the water bath or heating system maintains the required test temperature.
  8. Time and agitation — the container rotates for a fixed duration to reproduce mechanical washing action.
  9. Rinsing — the specimen is rinsed to remove residual washing liquor.
  10. Drying — specimens are dried under controlled conditions, away from direct heat that could distort results.
  11. Assessment — colour change and staining are evaluated, typically using grey scales.

Every one of these steps needs to be repeatable. If temperature drifts, agitation is inconsistent, or drying conditions vary, the same fabric could produce different fastness ratings in two separate tests. This is exactly why relying on manual or improvised washing setups is not considered reliable for formal testing.

Washing Fastness Tester Procedure

While the exact test conditions always depend on the applicable standard, customer specification, fibre type, dye class, and the laboratory’s own SOPs, a typical procedure follows this general flow:

  1. Cut the fabric specimen to the required dimensions.
  2. Attach the adjacent fabric as specified by the chosen test method.
  3. Prepare the washing liquor with the correct water-to-detergent ratio.
  4. Place the specimen and steel balls (if required) into the test container.
  5. Set the required temperature and time on the instrument.
  6. Run the test cycle.
  7. Remove, rinse, and dry the specimen under controlled conditions.
  8. Evaluate colour change and staining using grey scales or the method specified.
Testing Stage What Is Controlled Purpose
Specimen Preparation Fabric size and construction Ensures consistency
Washing Temperature and liquor conditions Simulates specified laundering
Agitation Mechanical action Reproduces washing stress
Rinsing Water and procedure Removes residual washing liquor
Drying Controlled drying conditions Prepares specimen for evaluation
Assessment Colour change and staining Determines fastness rating

Laboratories should always cross-check the exact parameters against the current version of the standard being applied, since conditions can differ meaningfully between methods.

Washing Fastness Standards

There isn’t a single universal condition that applies to every washing fastness test. The applicable method — including temperature, detergent, time, and mechanical action — depends entirely on the standard requested by the buyer or specified for the product category. Some of the commonly referenced standards in the textile industry include:

  • ISO 105-C06 — widely used for domestic and commercial laundering evaluation of textiles.
  • ISO 105-C08 — used for assessing colour fastness with reference detergents containing an optical brightening agent.
  • AATCC TM61 — commonly used in markets that follow American testing conventions, covering various wash conditions depending on the test option selected.

We’re not reproducing the exact clauses or numerical parameters of these standards here — laboratories should always refer to the current, official edition of the relevant standard and follow the specific conditions it prescribes, along with any buyer requirements.

Which standard is used for washing fastness testing?
Common standards for washing fastness testing include ISO 105-C06, ISO 105-C08, and AATCC TM61. The exact standard used depends on the buyer’s specification, market requirement, and fabric type, since each method defines different temperature, detergent, and time conditions.

What Does a Washing Fastness Test Measure?

A washing fastness test primarily measures two distinct outcomes:

Colour Change — This refers to the change in the original colour of the tested specimen itself, comparing its appearance before and after the wash cycle.

Staining — This refers to the transfer of colour from the tested specimen onto the adjacent fabric during washing.

Both are typically assessed using grey scales — one for colour change and one for staining — or other evaluation methods prescribed by the applicable standard. The resulting rating gives manufacturers and buyers a comparable, standardised way to judge how the dye is likely to behave in real-world laundering.

Types of Washing Fastness Tests

Not every washing fastness test looks the same. Depending on the applicable standard and the intended end use of the textile, laboratories may run:

  • Standard washing fastness testing at moderate, domestic-style conditions
  • Accelerated laundering evaluation designed to simulate multiple wash cycles in a shorter time
  • Tests at different temperature settings, depending on the product category
  • Tests using different detergent formulations or reference detergents
  • Tests involving different levels of mechanical action or agitation

No single washing fastness tester or test method covers every possible washing condition a fabric might encounter in real life. The choice of method should always match the buyer’s requirement or the intended market.

Applications of Washing Fastness Tester

A washing fastness tester is used across a wide range of settings in the textile and garment industry:

  • Garment manufacturing — checking finished garments before shipment
  • Textile dyeing units — validating dye recipes and fixation quality
  • Fabric processing houses — quality checks after finishing treatments
  • Apparel production — verifying fastness before cutting large fabric lots
  • Home textiles — testing bedsheets, curtains, and upholstery fabrics
  • Textile export — meeting buyer and country-specific compliance requirements
  • Buying-house inspection — pre-shipment quality verification
  • Third-party textile laboratories — independent testing for multiple clients
  • Research and development — evaluating new dyes, finishes, or fibre blends
  • Textile quality control departments — routine, ongoing production checks

In India, this kind of testing is particularly relevant given the scale of the textile industry — from dyeing units to garment manufacturing hubs. Clusters like Tiruppur and cities such as Bangalore house a large concentration of garment manufacturing and textile exporters, many of whom supply to international buyers with strict fastness requirements. A reliable washing fastness tester is a practical necessity for labs and factories operating in this environment.

Factors Affecting Washing Fastness

Several variables influence how a fabric performs in a washing fastness test:

  • Type of dye used
  • Quality of dye fixation
  • Fibre composition of the fabric
  • Dye concentration
  • Finishing treatments applied
  • Washing temperature
  • Detergent chemistry
  • Washing time and cycle length
  • Mechanical action during washing
  • pH of the washing liquor
  • Fabric construction (weave or knit density)
  • Quality of pretreatment before dyeing

Any one of these factors, if not properly controlled during production, can shift the colour change or staining result — sometimes significantly.

How to Improve Fabric Colour Fastness to Washing

While no single step guarantees a particular fastness rating, several practical measures consistently help:

  • Choose dyes that are well-suited to the specific fibre type
  • Ensure proper dye fixation before moving to finishing
  • Optimise dyeing time, temperature, and liquor ratio
  • Control soaping and washing-off steps carefully during dyeing
  • Follow recommended finishing procedures for the fabric type
  • Run laboratory testing before committing to bulk production
  • Compare in-house test results against the buyer’s technical specification
  • Maintain consistent parameters across production batches

These steps reduce the likelihood of fastness-related rejections later in the supply chain, though results should always be verified through actual testing rather than assumed.

How to Choose the Right Washing Fastness Tester

Selecting the right washing fastness tester depends on your lab’s testing volume, applicable standards, and budget. Key considerations include:

  • Which testing standards the instrument supports
  • Accuracy and range of temperature control
  • Number and size of test containers
  • Type of agitation mechanism
  • Timer accuracy and programmability
  • Heating system reliability
  • Build quality and construction material
  • Safety features, such as lid locking and overheat protection
  • Ease of cleaning between tests
  • Ongoing maintenance requirements
  • Expected daily or monthly testing workload
  • Calibration and verification support
  • Availability of technical support and spare parts

A small textile laboratory running occasional tests has different needs compared to a garment factory running daily quality checks, or a large third-party testing laboratory handling high volumes across multiple standards. Research facilities may also need more flexible parameter control for experimental work. Matching the equipment to actual testing needs — rather than buying based on capacity alone — tends to give better long-term value.

Why Use Textile Testing Equipment for Quality Control?

Reliable textile testing equipment, including washing fastness testers, crock meters, and light booths, plays a central role in quality assurance. Controlled testing supports:

  • Consistency across production batches
  • Repeatable results that can be compared over time
  • Stronger quality assurance before shipment
  • Better alignment with buyer compliance requirements
  • Ongoing monitoring during production
  • Faster troubleshooting when a fastness issue is identified
  • More informed decisions during product development

Without standardised testing equipment, quality decisions end up relying on visual judgement alone, which is far less reliable and harder to defend during a buyer audit.

Why Choose Amith Garment Services

Amith Garment Services supplies textile testing equipment, including washing fastness testers, to textile manufacturers, garment units, and testing laboratories. The focus is on providing equipment that supports accurate, repeatable testing aligned with commonly referenced industry standards.

For labs and factories evaluating a washing fastness tester or related textile laboratory equipment, it’s worth comparing instruments based on the testing standards they support, build quality, ease of use, and after-sales technical support — rather than price alone. Amith Garment Services also offers related garment testing instruments, such as crock meters and light booths, for teams looking to build a more complete in-house testing setup.

Whether you’re setting up a new textile testing laboratory or upgrading existing fabric testing equipment, it’s advisable to assess your specific testing requirements, applicable standards, and expected workload before finalising a purchase. You can explore the available range of testing instruments on the Amith Garment Services website to find equipment suited to your lab’s needs.

Ultimately, a dependable washing fastness tester is not just a compliance tool — it’s a practical safeguard that helps textile manufacturers and garment exporters catch colour fastness issues before they become expensive problems down the line.

Frequently Asked Questions

A washing fastness tester is used to check how well a fabric's colour withstands laundering. It simulates a wash cycle under controlled temperature, time, and mechanical action, allowing evaluation of colour change in the specimen and staining on an adjacent fabric. This helps textile manufacturers and garment exporters identify fastness issues before bulk production or shipment.

A washing fastness test typically involves preparing a fabric specimen with an adjacent fabric, placing them in a sealed container with a prepared washing liquor, and running the cycle at the temperature and duration specified by the applicable standard. The specimen is then rinsed, dried, and assessed using grey scales for colour change and staining.

Commonly referenced standards for colour fastness to washing include ISO 105-C06, ISO 105-C08, and AATCC TM61. The appropriate method depends on the buyer specification, target market, fabric category, and applicable testing requirements. Laboratories should follow the current official edition of the selected standard.

Factors affecting washing fastness include dye type, dye fixation, fibre composition, dye concentration, finishing treatments, washing temperature, detergent chemistry, mechanical agitation, fabric construction, and pretreatment quality. Changes in dyeing or finishing processes can affect colour change and staining results.

A washing fastness tester is used to test how well a fabric's colour holds up after washing. It helps identify colour fading and staining under controlled test conditions before fabric enters production or is shipped to buyers.

A small fabric specimen is tested with an adjacent fabric in a controlled washing machine or tester at a specified temperature and time. After washing, the specimen is rinsed and dried before colour change and staining are evaluated using appropriate grey scales.

Colour fastness to washing describes how well a textile retains its original colour and resists staining other materials when subjected to washing under specified test conditions.

Common standards include ISO 105-C06, ISO 105-C08, and AATCC TM61. The correct washing fastness test method depends on the textile product, buyer requirements, target market, and testing specification.

1 2 3 9