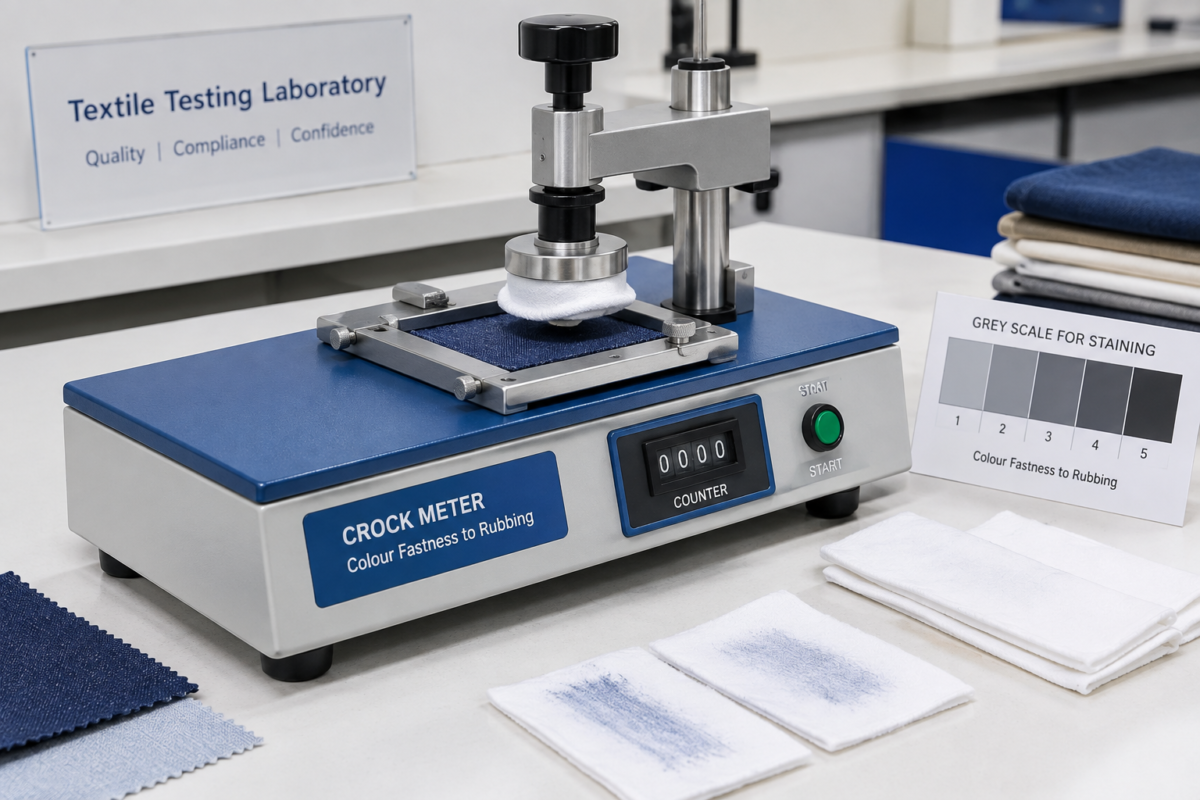
Crock Meter instrument used for colour fastness to rubbing testing in a textile lab

What Is a Crock Meter? Working Principle, Testing Procedure & Applications in Textile Testing

When a dyed fabric rubs against another surface — a car seat, a pair of hands, another garment in a suitcase — some of that colour can transfer. Anyone who has picked up a new pair of dark jeans and noticed blue staining on their palms has seen this happen firsthand. In a textile lab, this behaviour is measured with a Crock Meter, an instrument built specifically to test colour fastness to rubbing under controlled, repeatable conditions. Before a fabric or garment is approved for production or shipped to a buyer, this test tells a mill or exporter whether the colour will hold up to everyday handling — or end up as a customer complaint.

What Is a Crock Meter?

A Crock Meter is a testing instrument used to evaluate how much colour transfers from a dyed or printed textile onto another surface when the two are rubbed together. In textile terminology, this transfer of colour is called “crocking,” and the property being measured is colour fastness to rubbing.

Rather than rubbing fabric by hand — which varies from person to person and can’t be repeated the same way twice — a Crockmeter applies a fixed rubbing motion, using a set pressure and a defined number of strokes, so that results from one test can be reliably compared to another. The test involves rubbing a piece of standard white cotton test cloth against the specimen fabric, then assessing how much colour has transferred onto that white cloth.

What is a Crock Meter? 

A Crock Meter is a textile testing instrument that measures colour fastness to rubbing. It rubs a specimen fabric against a standard white test cloth under controlled pressure and motion, then the amount of colour transferred onto the cloth is assessed to judge how well a fabric’s dye resists rubbing off during normal handling.

Why Is Crock Meter Testing Important?

Colour transfer isn’t just a cosmetic issue — it affects how a product performs after it leaves the factory. A Crock Meter test gives quality teams a concrete, repeatable way to check this before goods are shipped.

This matters across several stages of production:

  • Dyeing and finishing — confirming that a dye has been properly fixed before fabric moves to cutting and stitching
  • Fabric quality control — screening incoming fabric lots before they’re approved for garment production
  • Garment quality testing — checking finished garments, especially dark or heavily dyed pieces, before packing
  • Export quality requirements — many international buyers specify minimum rubbing fastness ratings as part of their technical package
  • Production quality control — catching problems on the line rather than after a shipment has reached the customer

The consequences show up in familiar ways. Dark denim can leave blue marks on light-coloured seating or on hands during wear. Deeply dyed garments packed tightly for export can stain neighbouring lighter items in the same carton. Even light-coloured fabrics with poor pigment fixation can shed onto skin during repeated handling. Upholstery fabric that crocks can transfer colour onto clothing every time someone sits down. In each of these cases, a Crock Meter test run during development or before shipment is what catches the problem while it’s still fixable.

Why is colour fastness to rubbing important? 

Colour fastness to rubbing is important because it predicts whether a fabric’s dye will transfer onto other surfaces during normal handling, washing, or wear. Poor rubbing fastness leads to stained skin, garments, or upholstery, and often results in buyer rejections, returns, or complaints after a product has already shipped.

Crockmeter Working Principle

The Crockmeter working principle is built around consistency — the same rubbing action, applied the same way, every time a test is run.

  1. Specimen preparation — a sample of the fabric under test is cut to the size required by the applicable test method and conditioned as specified.
  2. Mounting the specimen — the fabric is secured flat on the testing base of the instrument, without folds or wrinkles that could affect contact.
  3. Preparing the rubbing material — a standard white test cloth is attached to the rubbing finger of the machine.
  4. Positioning the rubbing finger — the finger, wrapped with the test cloth, is lowered onto the specimen under a defined load.
  5. Applying controlled rubbing action — the machine moves the finger back and forth over the fabric for a set number of strokes at a consistent speed.
  6. Dry rubbing conditions — for the dry test, the white test cloth is used as-is, without moisture.
  7. Wet rubbing conditions — for the wet test, the test cloth is moistened according to the method before rubbing begins.
  8. Removing the rubbing cloth — once the cycle is complete, the test cloth is removed and, for wet tests, allowed to dry under the conditions specified.
  9. Assessing colour transfer — the stained test cloth is evaluated against a grey scale or other specified method to rate the degree of staining.

Because the pressure, stroke length, and stroke count stay the same from one test to the next, results become comparable across different fabrics, different operators, and even different labs — which is the whole point of using an instrument instead of a hand-rub.

Crock Meter Testing Procedure

Step 1: Prepare the Fabric Specimen

The fabric sample is cut and conditioned according to the applicable test method before testing begins, so that moisture and temperature don’t skew the result.

Step 2: Prepare the Rubbing Cloth

A standard white cotton rubbing cloth is used as the receiving surface. Its role is to give a neutral, consistent material against which colour transfer can be judged — using anything else would make results inconsistent between labs.

Step 3: Mount the Specimen

The specimen is clamped flat onto the testing base so it doesn’t shift or lift during rubbing, which could otherwise distort the amount of contact and pressure applied.

Step 4: Perform the Rubbing Test

The rubbing finger, loaded with the test cloth, moves across the specimen in a controlled back-and-forth motion for the number of cycles specified by the test method.

Step 5: Conduct Dry or Wet Rubbing

Depending on whether the buyer specification or standard calls for a dry rubbing test or a wet rubbing test, the rubbing cloth is used dry, or moistened beforehand as per the method.

Step 6: Evaluate Colour Transfer

Once rubbing is complete, the test cloth is assessed for staining, typically using a grey scale for staining, and the result is recorded as a rating.

The exact specimen dimensions, number of rubbing cycles, applied load, conditioning time, and evaluation method should always follow the specific standard and any customer specification in use — these details vary between test methods and should never be assumed.

Dry Rubbing Test vs Wet Rubbing Test

Parameter Dry Rubbing Test Wet Rubbing Test
Rubbing material Dry Moistened according to the test method
Test condition Dry Wet
Main purpose Assess colour transfer under dry rubbing Assess colour transfer under wet rubbing
Typical application General textile and garment testing Products where moisture exposure is relevant
Result assessment Staining/colour transfer assessment Staining/colour transfer assessment
Equipment Crock Meter Crock Meter

The dry rubbing test simulates everyday contact — handling, folding, sitting, general wear — where no moisture is involved. It’s the baseline test run on nearly every dyed or printed fabric.

The wet rubbing test simulates situations where moisture is present, such as perspiration during wear, contact with damp surfaces, or exposure during washing and handling while still damp. Because moisture tends to make dyes more mobile, wet rubbing fastness ratings are often lower than dry ratings for the same fabric — which is exactly why both tests exist and are usually run together.

What is the difference between dry rubbing and wet rubbing tests? 

A dry rubbing test uses a dry white test cloth to check colour transfer under normal, moisture-free contact. A wet rubbing test moistens the test cloth beforehand to check how the fabric performs when contact happens in damp conditions. Wet results are often lower because moisture increases dye mobility.

International Standards for Crock Meter Testing

Crock Meter testing is carried out against recognized international test methods, and it’s important to know which one applies to a given order.

ISO 105-X12 is an international textile test method covering colour fastness to rubbing. It’s widely referenced by buyers and labs working to ISO-based specifications.

AATCC 8 is a recognized AATCC test method for colourfastness to crocking, commonly specified by buyers and mills working within the North American market or AATCC-based specification systems.

Rather than assuming one standard fits every order, textile laboratories should confirm which method — and which edition of that method — applies based on the buyer’s technical package, the product category, and the market the goods are destined for. Standards are periodically revised, so labs should always work from the current applicable edition rather than an older copy on file.

Which standard is used for Crock Meter testing? 

Crock Meter testing is commonly carried out to ISO 105-X12 or AATCC 8, depending on the buyer, market, and product specification. There isn’t a single universal standard — the applicable method should be confirmed with the customer or based on the destination market before testing begins.

Applications of a Crock Meter in Textile Testing

A Crock Meter is used across a wide range of textile categories, including cotton fabrics, denim, knitted fabrics, woven fabrics, dyed fabrics, printed fabrics, finished garments, home textiles, upholstery fabric, workwear, fashion textiles, and technical textiles.

In India’s textile and garment manufacturing hubs — including centres like Bangalore and Tiruppur — Crock Meter testing is a routine part of quality control for both domestic production and export-oriented manufacturing. Garment exporters use it to confirm that dyed and printed fabrics meet buyer specifications before cutting begins, while in-house textile labs use it during dyeing and finishing development to catch fastness problems early, before a bulk batch is committed.

Factors Affecting Fabric Rubbing Fastness

Rubbing fastness isn’t determined by one single variable — it depends on how several factors interact in a specific fabric and dyeing process:

  • Dye type and dye class used
  • Dye concentration and shade depth
  • Degree of dye fixation achieved during processing
  • Fabric construction (weave or knit structure)
  • Fabric surface characteristics
  • Moisture present on the fabric or test cloth
  • Finishing treatments applied after dyeing
  • Washing-off process following dyeing or printing
  • Surface deposits, such as unfixed dye or finishing chemicals
  • Printing method used, for printed fabrics
  • The rubbing conditions themselves, including pressure and cycles

Poor rubbing fastness in one fabric might trace back to incomplete washing-off after dyeing, while in another it could stem from the printing binder used, or the fibre’s natural affinity for the dye class selected. The cause is specific to the material and process, which is why root-cause investigation matters more than assuming a single fix applies everywhere.

How to Improve Fabric Rubbing Fastness

Improving rubbing fastness usually starts upstream, in the dyeing and finishing stages, rather than at the point of testing:

  • Selecting dyes appropriate for the fibre type and end use
  • Ensuring proper dye fixation during and after dyeing
  • Optimizing dyeing conditions such as time, temperature, and liquor ratio
  • Carrying out thorough washing-off to remove unfixed dye
  • Choosing finishing processes that don’t compromise fastness
  • Controlling production parameters consistently across batches
  • Testing during product development, not just at final inspection
  • Testing production batches at regular intervals, not only samples
  • Investigating any poor result before goods are approved for shipment

The right corrective action depends on the fibre, the dye class in use, the fabric construction, the finishing process applied, and the specific production conditions on the floor — a fix that works for one mill’s process may not apply directly to another’s.

Choosing the Right Crock Meter Machine

For labs or manufacturers evaluating a Crock Meter machine purchase, a few practical points are worth checking before deciding:

  • Whether the machine supports the testing standards your buyers or market require
  • Dry and wet rubbing capability in a single unit
  • Consistency of the controlled rubbing action across repeated tests
  • Build quality and long-term durability for daily lab use
  • Ease of mounting specimens and rubbing cloth
  • Repeatability of results across operators
  • Fit with your lab’s existing testing workflow
  • Calibration and verification requirements over the equipment’s life
  • Availability of technical support after installation
  • Access to spare parts when components wear out
  • Installation and service support from the supplier
  • The supplier’s experience specifically with textile testing instruments

For labs sourcing locally, working with an established Crockmeter manufacturer in India or a Crockmeter supplier in Bangalore can simplify installation, calibration support, and access to spares — factors that matter more over the equipment’s working life than at the time of purchase alone.

Why Choose Amith Garment Services?

Amith Garment Services supplies textile and garment testing equipment to laboratories, manufacturers, and exporters working across India’s textile industry. Our focus is on helping labs select equipment that actually fits their testing requirements — whether that’s a Crock Meter for rubbing fastness, a Light Booth for shade evaluation, or a Colour Matching Cabinet for visual assessment under controlled lighting.

We work with customers to understand the standards they test against, the product categories they handle, and the specification requirements set by their buyers, so equipment recommendations are grounded in actual lab needs rather than generic sales pitches. Beyond the initial purchase, we support installation and provide technical assistance so labs can keep testing running smoothly as part of their day-to-day quality control.

```html

Frequently Asked Questions

A Crock Meter is used to test colour fastness to rubbing on dyed, printed, or finished textiles. It helps labs and manufacturers determine whether colour will transfer from a fabric onto another surface during normal handling, wear, or washing. This is especially important for dark or heavily dyed fabrics like denim, where colour transfer onto skin or lighter garments is a common complaint. The test is run at multiple production stages, including fabric approval, garment quality checks, and pre-shipment inspection, to catch issues before goods reach the customer.

The fabric specimen is conditioned and mounted on the instrument's testing base. A standard white test cloth is attached to the rubbing finger, which is then lowered onto the specimen under a fixed load. The machine performs a set number of controlled back-and-forth rubbing strokes. Depending on whether a dry or wet rubbing test is required, the test cloth is used dry or moistened beforehand. After rubbing, the test cloth is assessed for staining, typically using a grey scale, and the result is recorded according to the applicable standard.

A dry rubbing test uses a dry white test cloth to check how a fabric behaves under normal, moisture-free contact, such as handling or everyday wear. A wet rubbing test moistens the test cloth beforehand, simulating contact under damp conditions like perspiration or exposure to moisture. Because dye tends to become more mobile when wet, wet rubbing fastness results are often lower than dry results for the same fabric. Both tests are commonly run together to give a complete picture of a fabric's rubbing fastness performance.

Crock Meter testing is commonly carried out to methods such as ISO 105-X12, an international standard for colour fastness to rubbing, or AATCC 8, an AATCC method for colourfastness to crocking. The correct standard to use depends on the buyer's technical specification, the destination market, and the product category involved. Since standards are periodically revised, textile laboratories should always confirm they are working from the current applicable edition rather than assuming one method applies universally to every order.
```
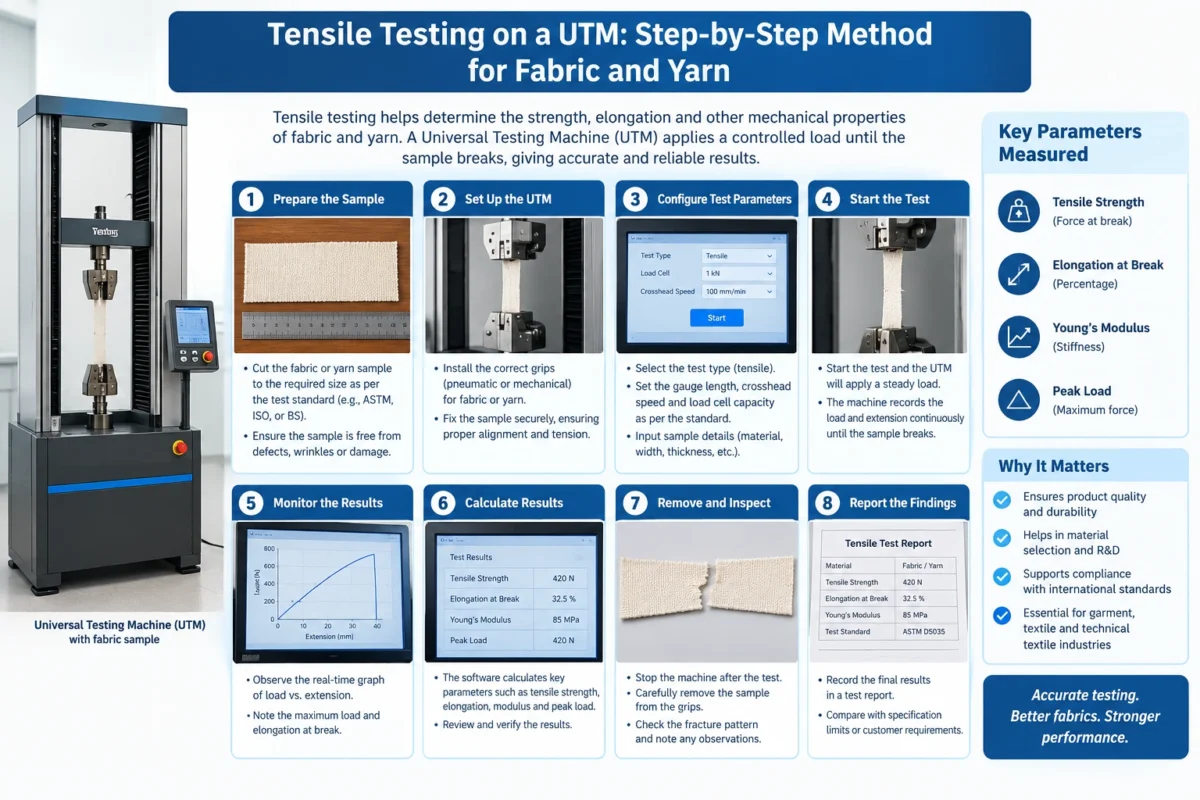
Tensile Testing on a UTM: Step-by-Step Method for Fabric and Yarn

Tensile Testing on a UTM: Step-by-Step Method for Fabric and Yarn

If you’ve spent any time on a textile testing floor, you already know that a fabric or yarn can look perfectly fine and still fail under load. That’s exactly why a universal testing machine tensile test exists — it tells you, in numbers, how much force a material can take before it gives way. For manufacturers, exporters, and testing labs across India’s textile hubs, this single test often decides whether a lot gets shipped or gets rejected.

This article walks through how tensile testing actually works on a Universal Testing Machine (UTM), what happens at each stage of the process, and the practical details that separate a reliable test from a questionable one.

What Is a Universal Testing Machine Tensile Test?

A universal testing machine tensile test measures how a material behaves when it is stretched until it breaks. The machine applies a steadily increasing pulling force to a fabric or yarn specimen while recording the force and the amount of stretch (elongation) at every point until failure.

A universal testing machine tensile test applies a controlled pulling force to a fabric or yarn sample until it breaks, while measuring breaking force and elongation. It helps determine how strong a material is and whether it meets required quality or export standards.

The term “universal” comes from the machine’s ability to perform more than one type of mechanical test — tension, and in many configurations, compression or bursting-related tests — depending on the fixtures fitted to it. For textile applications, the tensile mode is what’s used most often, since it directly reflects how a fabric or yarn will perform under real handling and wear.

Why Is Tensile Testing Important for Fabric and Yarn?

Textile products go through constant mechanical stress — stitching, washing, stretching during wear, and handling during manufacturing. A fabric that tears too easily or a yarn that snaps during weaving creates costly problems downstream.

Tensile testing is important because it predicts how fabric or yarn will hold up during manufacturing, washing, and everyday use. It helps identify weak batches before they reach production, reducing rejections, returns, and quality complaints from buyers.

Some practical reasons this test matters:

  • It confirms whether incoming fabric or yarn meets buyer specifications before cutting or weaving begins.
  • It flags inconsistencies between lots from the same supplier.
  • It supports compliance documentation for garment exporters and buying houses.
  • It helps quality managers catch process issues, such as poor yarn twist or uneven fabric construction, early.

How Does a Universal Testing Machine Work for Textiles?

At its core, a UTM has a fixed lower grip and a moving upper grip (the crosshead), driven by a motor. The specimen is clamped between the two grips. As the crosshead moves upward at a controlled speed, it stretches the specimen while a load cell continuously measures the resisting force.

This data is plotted as a force-extension curve, which shows how the material responds at every stage — from initial stretch, through any yielding, up to the point of complete failure. The gauge length (the distance between the grips at the start of the test) and the test speed are both set according to the applicable standard and material type, since these directly influence the recorded values.

Tensile Testing on a UTM: Step-by-Step Method

1. Prepare the UTM and Test Accessories

Before any specimen is loaded, the machine should be checked and calibrated as per laboratory protocol. The correct load cell capacity and grips — flat jaws for fabric, capstan or specific yarn grips for yarn — need to be fitted based on the material being tested.

2. Select and Prepare the Specimen

Specimens are cut or drawn according to the applicable test standard, taking care to avoid folds, creases, or visible defects that could distort results. For fabric, samples are typically taken in both warp and weft directions; for yarn, individual strands are prepared without unnecessary handling that could alter twist or tension.

3. Set the Test Parameters

Gauge length, test speed, and pre-tension (if applicable) are entered into the UTM’s software or control panel. These parameters depend entirely on the standard being followed and the material category — they are not one-size-fits-all settings.

4. Mount the Fabric or Yarn Specimen

The specimen is clamped centrally and squarely in the grips. Correct gripping is critical — if the specimen is angled, loose, or unevenly tensioned, the results will not reflect the material’s true strength.

5. Start the Tensile Test

Once mounted, the test is started, and the crosshead begins to move at the set speed, applying continuous tension until the specimen breaks or reaches the defined end condition.

6. Record Breaking Force and Elongation

The UTM logs the breaking force (the peak load recorded before failure) and the elongation at break (how much the specimen stretched at that point). Both values are captured automatically by the software in most modern machines.

7. Analyze and Report the Results

The force-extension curve is reviewed to check whether the specimen broke cleanly within the gauge area or slipped/failed at the grips — a slip invalidates the reading. Multiple repeat specimens are tested, and the results are averaged and reported alongside the standard followed.

UTM Tensile Testing for Fabric

Fabric tensile testing brings its own set of practical considerations. Fabric is tested separately in the warp and weft directions because woven fabrics are rarely equally strong in both directions — yarn density, weave pattern, and finishing processes all affect this.

Key points for fabric tensile testing:

  • Specimen preparation must follow the applicable standard for width, length, and edge treatment (raveled or cut strip).
  • Grip selection and jaw pressure need to be appropriate for the fabric’s thickness and surface — too little pressure causes slippage, too much can damage the yarns at the grip line.
  • Fabric construction — woven, knitted, or nonwoven — changes how the material stretches; knitted fabrics generally show much higher elongation than woven fabrics due to their loop structure.
  • Where seams are part of the test setup, it should be noted whether failure occurred at the seam or in the fabric itself, since this changes what the result actually tells you.
  • Repeat testing across multiple specimens per direction gives a more reliable average than relying on a single reading.

UTM Tensile Testing for Yarn

Yarn tensile testing follows a different logic because yarn is a much finer, more flexible specimen than fabric.

Important factors include:

  • Yarn count and construction — finer yarns naturally register lower breaking force than coarser ones, so results are usually interpreted alongside count.
  • Twist level influences both strength and elongation; too little or too much twist relative to the yarn’s design can show up clearly in test results.
  • Grip selection matters even more here, since yarn is prone to slippage at the jaws if the wrong grip type or pressure is used.
  • The location of yarn break is worth noting — a break near the grip often signals a gripping problem rather than a true material weakness.
  • Result consistency across repeat measurements is essential, since yarn is more variable along its length than fabric.

These results feed directly into decisions made during spinning, weaving, knitting, and downstream garment manufacturing, where yarn strength affects both process efficiency and final product performance.

Fabric Tensile Testing vs Yarn Tensile Testing

Aspect Fabric Tensile Testing Yarn Tensile Testing
Specimen form Strip or grab sample of fabric Single yarn strand
Test directions Warp and weft Along the yarn axis only
Common grip type Flat rubber-faced jaws Capstan or specialized yarn grips
Key influencing factor Weave/knit construction Yarn count and twist
Typical failure point Within gauge length or at seam Within gauge length or near grip
Primary use Fabric strength, garment quality Spinning and weaving process control

Important Test Parameters in Textile Tensile Testing

Several parameters influence the outcome of a tensile test, and each should be set according to the applicable standard rather than assumed:

  • Gauge length – the initial distance between grips.
  • Test speed – the rate at which the crosshead moves.
  • Pre-tension – the small initial tension applied before the test begins, used for some yarn methods.
  • Conditioning – textiles are sensitive to humidity and temperature, so specimens are often conditioned in a controlled atmosphere before testing to get comparable results.

International Standards for Textile Tensile Testing

Textile tensile testing is generally carried out with reference to internationally recognized standards, including:

  • ISO 13934-1 – Tensile properties of fabrics using the strip method
  • ISO 13934-2 – Tensile properties of fabrics using the grab method
  • ISO 2062 – Determination of single-end breaking force and elongation at break for yarn
  • ASTM D5034 – Breaking strength and elongation of textile fabrics (grab test)
  • ASTM D5035 – Breaking force and elongation of textile fabrics (strip method)

The exact specimen dimensions, gauge length, test speed, conditioning requirements, and reporting format vary between these standards and depend on the material being tested. Laboratories should always refer to the latest edition of the applicable standard rather than relying on general guidance alone.

Factors That Affect Tensile Test Results

Even with a well-calibrated UTM, results can vary due to avoidable errors:

  • Specimen slippage at the grips, which lowers the apparent breaking force
  • Incorrect gripping or misaligned clamping, causing uneven load distribution
  • Machine misalignment, which introduces bending stress instead of pure tension
  • Inconsistent conditioning, since humidity changes fabric and yarn properties
  • Wrong test direction, especially confusing warp and weft on anisotropic fabrics
  • Calibration drift in the load cell or crosshead speed
  • Incorrect test parameters entered for the material or standard
  • Operator handling during specimen preparation and mounting
  • Insufficient repeat testing, leading to results based on a single unrepresentative sample

How to Improve Textile Tensile Testing Accuracy

Improving accuracy comes down to discipline in the basics rather than expensive upgrades:

  • Calibrate the UTM and load cell on a regular schedule
  • Condition specimens as specified before testing
  • Use the correct grip type and jaw pressure for the material
  • Align specimens carefully and consistently
  • Follow the exact parameters specified in the chosen standard
  • Test enough repeat specimens to get a statistically meaningful average
  • Document any slippage, grip failure, or abnormal breaks separately from valid results

Choosing the Right Universal Testing Machine for Textiles

When evaluating a Universal Testing Machine for textiles, labs typically look at the range of load cells available, the variety of grips and fixtures that can be fitted, software capability for recording force-extension curves, and ease of switching between fabric and yarn testing setups. The right choice depends on the range of materials a lab regularly tests and the standards it needs to comply with.

Industries That Use UTM Tensile Testing

Tensile testing on a UTM is used well beyond a single sector:

  • Textile manufacturing units checking incoming raw material and in-process fabric
  • Garment factories verifying fabric strength before cutting
  • Textile exporters meeting buyer and compliance requirements
  • Textile testing laboratories offering independent verification services
  • Buying houses conducting pre-shipment quality checks
  • Technical textile and nonwoven producers checking material performance for specialized applications

Textile clusters such as Tiruppur and other manufacturing regions across India rely heavily on this kind of testing to maintain consistent quality for both domestic and export markets.

Why Choose Amith Garment Services

Amith Garment Services works with textile manufacturers, garment exporters, testing laboratories, and quality control teams who need dependable Textile Testing Equipment for day-to-day fabric and yarn evaluation. Alongside Universal Testing Machines, the range of Textile Laboratory Equipment supports broader quality control needs — from colour fastness to fabric inspection — helping labs build a complete, standards-based testing setup suited to their specific product range.

Conclusion

A universal testing machine tensile test remains one of the most direct ways to verify how a fabric or yarn will actually perform once it leaves the lab. Getting reliable results depends less on the machine alone and more on consistent specimen preparation, correct gripping, proper conditioning, and adherence to the relevant standard. For manufacturers, exporters, and testing labs working to consistent quality benchmarks, a properly selected and well-maintained UTM, used with disciplined testing practices, remains central to dependable textile quality control.

Frequently Asked Questions

A universal testing machine tensile test is a laboratory procedure where a fabric or yarn specimen is stretched under controlled conditions until it breaks. The machine records the breaking force and elongation throughout the process. This data helps textile manufacturers, exporters, and testing labs verify whether a material meets required strength specifications before it moves further into production or shipment.

Yes, a single UTM can test both fabric and yarn, provided it is fitted with the correct grips and load cell for each material type. Fabric typically requires flat jaw grips, while yarn testing often uses capstan or specialized grips to reduce slippage. The test parameters, such as gauge length and speed, are also adjusted according to the material and applicable standard.

During textile tensile testing, the two primary measurements are breaking force and elongation at break. Breaking force shows the maximum load the specimen withstood, while elongation shows how much it stretched before failing. Together, these values are plotted as a force-extension curve, which gives a fuller picture of how the material behaves under increasing tension.

Specimen preparation directly affects the reliability of tensile test results. Incorrect cutting, damaged edges, improper conditioning, or inconsistent handling can all distort the breaking force and elongation values recorded. Careful preparation, following the relevant standard, ensures that the universal testing machine tensile test reflects the true strength of the fabric or yarn rather than an error introduced during setup.

It's used to check how strong a fabric or yarn is by pulling it until it breaks and measuring the force and stretch involved, which helps confirm quality before manufacturing or export.

You cut fabric strips in the warp and weft directions, clamp them into the UTM's grips, and stretch them at a set speed until they break, recording the force and stretch at that point.

A yarn strand is clamped carefully to avoid slipping, then stretched at a controlled speed until it snaps, with the machine recording the breaking force and elongation.

It means how much a fabric or yarn stretches, as a percentage of its original length, right before it breaks during the tensile test.

washing fastness tester

Washing Fastness Tester: Working Principle, Procedure, Standards & Applications

When a customer buys a shirt, a bedsheet, or a school uniform, the last thing they expect is for the colour to bleed or fade after the first few washes. Yet this is one of the most common quality complaints textile manufacturers and garment exporters deal with. Colour durability during laundering is not a minor detail — it directly affects buyer satisfaction, brand reputation, and whether a shipment gets accepted or rejected at inspection.

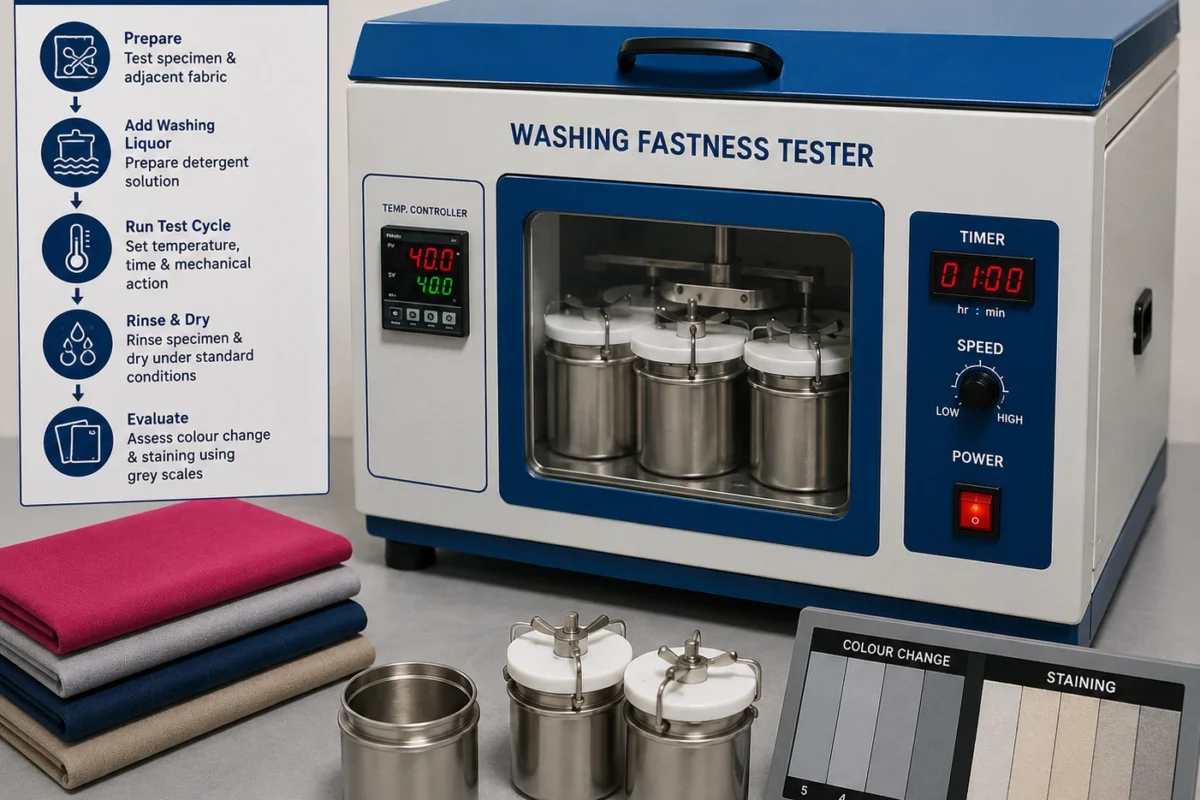
This is where a washing fastness tester becomes essential. It is a laboratory instrument used to simulate domestic or industrial washing conditions on a small fabric specimen, so that colour change and staining can be assessed before the fabric or garment goes into bulk production. For textile manufacturers, garment exporters, testing laboratories, and quality-control teams, this single test can prevent costly rework, disputes with buyers, and returned shipments.

In this article, we’ll walk through what a washing fastness tester is, how it works, the general testing procedure, the standards commonly referenced, and where this equipment is used across the textile and garment industry.

What Is a Washing Fastness Tester?

A washing fastness tester is a piece of textile testing equipment designed to evaluate how well a dyed or printed fabric holds its colour when subjected to controlled washing conditions. It’s used across textile testing laboratories, garment factories, and buying-house inspection units to check Colour Fastness to Washing — essentially, how resistant a fabric’s colour is to laundering.

The instrument typically works by placing fabric specimens, along with an adjacent (multi-fibre) fabric, inside sealed containers along with a washing liquor. These containers are then rotated at a controlled temperature for a specified duration, replicating the mechanical and chemical stress of an actual wash cycle.

Two main properties are evaluated after the test:

  • Colour change in the original specimen
  • Staining on the adjacent fabric

Because even small variations in temperature, time, or agitation can change the outcome, controlled laboratory conditions are critical. A washing fastness tester allows this consistency, which is something a normal washing machine simply cannot guarantee.

What is a washing fastness tester?
A washing fastness tester is a laboratory instrument that evaluates how well a dyed fabric retains its colour when washed under controlled conditions. It measures colour change in the specimen and staining on an adjacent fabric, helping textile and garment manufacturers assess Colour Fastness to Washing before production.

Why Is Washing Fastness Testing Important?

Washing fastness testing matters across almost every category of textile product — garments, dyed fabrics, home textiles, apparel, uniforms, children’s clothing, workwear, and export-bound products. Each of these goes through repeated washing during its usable life, and the colour is expected to hold up reasonably well throughout.

Poor washing fastness can lead to several downstream issues:

  • Noticeable colour fading after a few wash cycles
  • Colour transfer onto skin or other garments
  • Staining of adjacent fabrics in a mixed laundry load
  • Customer complaints and returns
  • Rejection of bulk shipments during buyer inspection
  • Repeated quality-control failures that slow down production timelines

For garment exporters in particular, many international buyers specify a minimum fastness rating as part of their technical package. Failing to meet that rating, even by a small margin, can result in an entire consignment being put on hold.

Why is washing fastness important?
Washing fastness testing is important because it predicts how a fabric’s colour will behave after repeated laundering. Without it, manufacturers risk colour fading, staining of other garments, buyer rejection, and customer complaints — issues that are far more expensive to fix after production than before it.

How Does a Washing Fastness Tester Work?

The working principle behind a washing fastness tester is based on simulating a wash cycle under repeatable, measurable conditions. While exact parameters vary by standard, the general sequence looks like this:

  1. Preparation of the textile specimen — a fabric sample is cut to the required size.
  2. Selection of adjacent fabric — a multi-fibre or single-fibre fabric is chosen based on the applicable test method.
  3. Preparation of washing liquor — water is prepared at the specified concentration and, where required, combined with detergent or soap.
  4. Addition of detergent or soap — added only where the applicable standard calls for it.
  5. Loading the specimen — the specimen and adjacent fabric are sewn together and placed into the test container along with steel balls, if specified.
  6. Controlled washing conditions — the container is sealed and placed into the instrument.
  7. Temperature control — the water bath or heating system maintains the required test temperature.
  8. Time and agitation — the container rotates for a fixed duration to reproduce mechanical washing action.
  9. Rinsing — the specimen is rinsed to remove residual washing liquor.
  10. Drying — specimens are dried under controlled conditions, away from direct heat that could distort results.
  11. Assessment — colour change and staining are evaluated, typically using grey scales.

Every one of these steps needs to be repeatable. If temperature drifts, agitation is inconsistent, or drying conditions vary, the same fabric could produce different fastness ratings in two separate tests. This is exactly why relying on manual or improvised washing setups is not considered reliable for formal testing.

Washing Fastness Tester Procedure

While the exact test conditions always depend on the applicable standard, customer specification, fibre type, dye class, and the laboratory’s own SOPs, a typical procedure follows this general flow:

  1. Cut the fabric specimen to the required dimensions.
  2. Attach the adjacent fabric as specified by the chosen test method.
  3. Prepare the washing liquor with the correct water-to-detergent ratio.
  4. Place the specimen and steel balls (if required) into the test container.
  5. Set the required temperature and time on the instrument.
  6. Run the test cycle.
  7. Remove, rinse, and dry the specimen under controlled conditions.
  8. Evaluate colour change and staining using grey scales or the method specified.
Testing Stage What Is Controlled Purpose
Specimen Preparation Fabric size and construction Ensures consistency
Washing Temperature and liquor conditions Simulates specified laundering
Agitation Mechanical action Reproduces washing stress
Rinsing Water and procedure Removes residual washing liquor
Drying Controlled drying conditions Prepares specimen for evaluation
Assessment Colour change and staining Determines fastness rating

Laboratories should always cross-check the exact parameters against the current version of the standard being applied, since conditions can differ meaningfully between methods.

Washing Fastness Standards

There isn’t a single universal condition that applies to every washing fastness test. The applicable method — including temperature, detergent, time, and mechanical action — depends entirely on the standard requested by the buyer or specified for the product category. Some of the commonly referenced standards in the textile industry include:

  • ISO 105-C06 — widely used for domestic and commercial laundering evaluation of textiles.
  • ISO 105-C08 — used for assessing colour fastness with reference detergents containing an optical brightening agent.
  • AATCC TM61 — commonly used in markets that follow American testing conventions, covering various wash conditions depending on the test option selected.

We’re not reproducing the exact clauses or numerical parameters of these standards here — laboratories should always refer to the current, official edition of the relevant standard and follow the specific conditions it prescribes, along with any buyer requirements.

Which standard is used for washing fastness testing?
Common standards for washing fastness testing include ISO 105-C06, ISO 105-C08, and AATCC TM61. The exact standard used depends on the buyer’s specification, market requirement, and fabric type, since each method defines different temperature, detergent, and time conditions.

What Does a Washing Fastness Test Measure?

A washing fastness test primarily measures two distinct outcomes:

Colour Change — This refers to the change in the original colour of the tested specimen itself, comparing its appearance before and after the wash cycle.

Staining — This refers to the transfer of colour from the tested specimen onto the adjacent fabric during washing.

Both are typically assessed using grey scales — one for colour change and one for staining — or other evaluation methods prescribed by the applicable standard. The resulting rating gives manufacturers and buyers a comparable, standardised way to judge how the dye is likely to behave in real-world laundering.

Types of Washing Fastness Tests

Not every washing fastness test looks the same. Depending on the applicable standard and the intended end use of the textile, laboratories may run:

  • Standard washing fastness testing at moderate, domestic-style conditions
  • Accelerated laundering evaluation designed to simulate multiple wash cycles in a shorter time
  • Tests at different temperature settings, depending on the product category
  • Tests using different detergent formulations or reference detergents
  • Tests involving different levels of mechanical action or agitation

No single washing fastness tester or test method covers every possible washing condition a fabric might encounter in real life. The choice of method should always match the buyer’s requirement or the intended market.

Applications of Washing Fastness Tester

A washing fastness tester is used across a wide range of settings in the textile and garment industry:

  • Garment manufacturing — checking finished garments before shipment
  • Textile dyeing units — validating dye recipes and fixation quality
  • Fabric processing houses — quality checks after finishing treatments
  • Apparel production — verifying fastness before cutting large fabric lots
  • Home textiles — testing bedsheets, curtains, and upholstery fabrics
  • Textile export — meeting buyer and country-specific compliance requirements
  • Buying-house inspection — pre-shipment quality verification
  • Third-party textile laboratories — independent testing for multiple clients
  • Research and development — evaluating new dyes, finishes, or fibre blends
  • Textile quality control departments — routine, ongoing production checks

In India, this kind of testing is particularly relevant given the scale of the textile industry — from dyeing units to garment manufacturing hubs. Clusters like Tiruppur and cities such as Bangalore house a large concentration of garment manufacturing and textile exporters, many of whom supply to international buyers with strict fastness requirements. A reliable washing fastness tester is a practical necessity for labs and factories operating in this environment.

Factors Affecting Washing Fastness

Several variables influence how a fabric performs in a washing fastness test:

  • Type of dye used
  • Quality of dye fixation
  • Fibre composition of the fabric
  • Dye concentration
  • Finishing treatments applied
  • Washing temperature
  • Detergent chemistry
  • Washing time and cycle length
  • Mechanical action during washing
  • pH of the washing liquor
  • Fabric construction (weave or knit density)
  • Quality of pretreatment before dyeing

Any one of these factors, if not properly controlled during production, can shift the colour change or staining result — sometimes significantly.

How to Improve Fabric Colour Fastness to Washing

While no single step guarantees a particular fastness rating, several practical measures consistently help:

  • Choose dyes that are well-suited to the specific fibre type
  • Ensure proper dye fixation before moving to finishing
  • Optimise dyeing time, temperature, and liquor ratio
  • Control soaping and washing-off steps carefully during dyeing
  • Follow recommended finishing procedures for the fabric type
  • Run laboratory testing before committing to bulk production
  • Compare in-house test results against the buyer’s technical specification
  • Maintain consistent parameters across production batches

These steps reduce the likelihood of fastness-related rejections later in the supply chain, though results should always be verified through actual testing rather than assumed.

How to Choose the Right Washing Fastness Tester

Selecting the right washing fastness tester depends on your lab’s testing volume, applicable standards, and budget. Key considerations include:

  • Which testing standards the instrument supports
  • Accuracy and range of temperature control
  • Number and size of test containers
  • Type of agitation mechanism
  • Timer accuracy and programmability
  • Heating system reliability
  • Build quality and construction material
  • Safety features, such as lid locking and overheat protection
  • Ease of cleaning between tests
  • Ongoing maintenance requirements
  • Expected daily or monthly testing workload
  • Calibration and verification support
  • Availability of technical support and spare parts

A small textile laboratory running occasional tests has different needs compared to a garment factory running daily quality checks, or a large third-party testing laboratory handling high volumes across multiple standards. Research facilities may also need more flexible parameter control for experimental work. Matching the equipment to actual testing needs — rather than buying based on capacity alone — tends to give better long-term value.

Why Use Textile Testing Equipment for Quality Control?

Reliable textile testing equipment, including washing fastness testers, crock meters, and light booths, plays a central role in quality assurance. Controlled testing supports:

  • Consistency across production batches
  • Repeatable results that can be compared over time
  • Stronger quality assurance before shipment
  • Better alignment with buyer compliance requirements
  • Ongoing monitoring during production
  • Faster troubleshooting when a fastness issue is identified
  • More informed decisions during product development

Without standardised testing equipment, quality decisions end up relying on visual judgement alone, which is far less reliable and harder to defend during a buyer audit.

Why Choose Amith Garment Services

Amith Garment Services supplies textile testing equipment, including washing fastness testers, to textile manufacturers, garment units, and testing laboratories. The focus is on providing equipment that supports accurate, repeatable testing aligned with commonly referenced industry standards.

For labs and factories evaluating a washing fastness tester or related textile laboratory equipment, it’s worth comparing instruments based on the testing standards they support, build quality, ease of use, and after-sales technical support — rather than price alone. Amith Garment Services also offers related garment testing instruments, such as crock meters and light booths, for teams looking to build a more complete in-house testing setup.

Whether you’re setting up a new textile testing laboratory or upgrading existing fabric testing equipment, it’s advisable to assess your specific testing requirements, applicable standards, and expected workload before finalising a purchase. You can explore the available range of testing instruments on the Amith Garment Services website to find equipment suited to your lab’s needs.

Ultimately, a dependable washing fastness tester is not just a compliance tool — it’s a practical safeguard that helps textile manufacturers and garment exporters catch colour fastness issues before they become expensive problems down the line.

Frequently Asked Questions

A washing fastness tester is used to check how well a fabric's colour withstands laundering. It simulates a wash cycle under controlled temperature, time, and mechanical action, allowing evaluation of colour change in the specimen and staining on an adjacent fabric. This helps textile manufacturers and garment exporters identify fastness issues before bulk production or shipment.

A washing fastness test typically involves preparing a fabric specimen with an adjacent fabric, placing them in a sealed container with a prepared washing liquor, and running the cycle at the temperature and duration specified by the applicable standard. The specimen is then rinsed, dried, and assessed using grey scales for colour change and staining.

Commonly referenced standards for colour fastness to washing include ISO 105-C06, ISO 105-C08, and AATCC TM61. The appropriate method depends on the buyer specification, target market, fabric category, and applicable testing requirements. Laboratories should follow the current official edition of the selected standard.

Factors affecting washing fastness include dye type, dye fixation, fibre composition, dye concentration, finishing treatments, washing temperature, detergent chemistry, mechanical agitation, fabric construction, and pretreatment quality. Changes in dyeing or finishing processes can affect colour change and staining results.

A washing fastness tester is used to test how well a fabric's colour holds up after washing. It helps identify colour fading and staining under controlled test conditions before fabric enters production or is shipped to buyers.

A small fabric specimen is tested with an adjacent fabric in a controlled washing machine or tester at a specified temperature and time. After washing, the specimen is rinsed and dried before colour change and staining are evaluated using appropriate grey scales.

Colour fastness to washing describes how well a textile retains its original colour and resists staining other materials when subjected to washing under specified test conditions.

Common standards include ISO 105-C06, ISO 105-C08, and AATCC TM61. The correct washing fastness test method depends on the textile product, buyer requirements, target market, and testing specification.

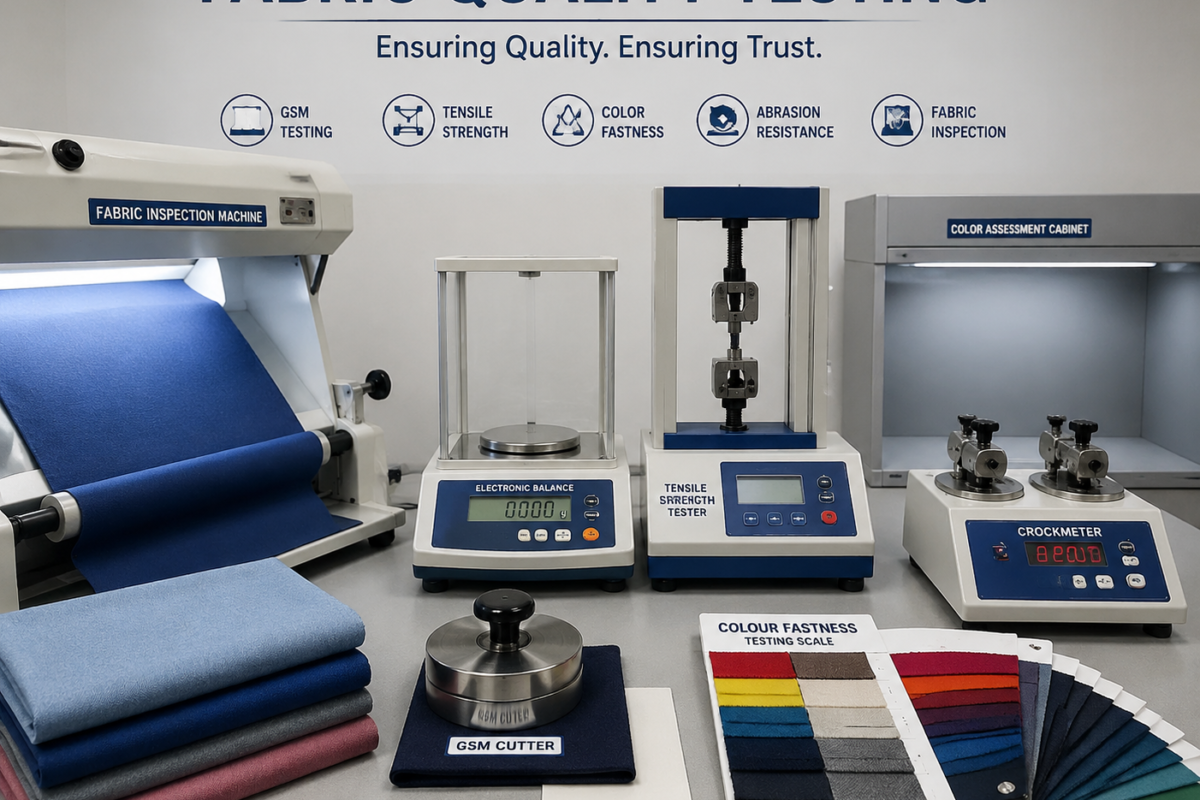
Fabric Quality Testing

Textile Testing Methods: A Complete Guide to Fabric Quality Testing

Introduction

The quality of a textile product is determined long before the finished garment reaches the customer. Every stage of textile production, from fibre selection and yarn manufacturing to fabric processing and garment production, can influence the final quality and performance of the material. This is why textile testing methods play an important role in the modern textile and apparel industry.

Textile testing helps manufacturers measure important fabric properties such as weight, strength, colour fastness, shrinkage, abrasion resistance, moisture, dimensional stability and overall appearance. By testing these properties before and during production, manufacturers can identify quality issues early and reduce the risk of product rejection, customer complaints and unnecessary production losses.

For garment manufacturers, textile exporters, buying houses and quality-control laboratories, fabric quality testing is also important for meeting buyer specifications and applicable testing standards.

This complete guide explains the major textile testing methods, the importance of fabric testing and the equipment commonly used in textile quality-control laboratories.

What Is Textile Testing?

Textile testing is the process of evaluating the physical, mechanical and performance characteristics of fibres, yarns, fabrics and finished garments.

The purpose of testing is to determine whether a textile material meets the required quality specifications for its intended application.

For example, a fabric used for sportswear may need to be tested for moisture-related performance and durability, while upholstery fabric may require abrasion and strength testing. Similarly, export garments may need to meet specific buyer requirements related to colour fastness, shrinkage and dimensional stability.

Common textile properties evaluated during testing include:

  • Fabric weight
  • Tensile strength
  • Tear strength
  • Bursting strength
  • Colour fastness
  • Abrasion resistance
  • Pilling resistance
  • Shrinkage
  • Fabric appearance
  • Dimensional stability
  • Moisture content
  • Fibre properties

A systematic testing process helps manufacturers make quality decisions based on measurable results rather than visual judgement alone.

Why Is Fabric Quality Testing Important?

Fabric quality directly affects the performance, appearance and durability of finished garments and textile products.

Without proper testing, defects may remain undetected until after garments have been produced or delivered. At that stage, correcting the problem can become expensive.

The major benefits of textile testing include:

1. Maintaining Consistent Product Quality

Testing helps manufacturers monitor whether fabrics from different production batches meet the same required specifications.

Even small variations in fabric weight, strength or colour can affect the consistency of the final product.

2. Detecting Defects Early

Testing can identify potential problems before bulk production or shipment.

Early defect detection can reduce:

  • Material wastage
  • Rework
  • Production delays
  • Customer complaints
  • Product returns

3. Meeting Buyer Requirements

Many textile manufacturers and exporters work according to specific buyer specifications. Textile testing provides measurable information that can help verify whether the product meets those requirements.

4. Improving Product Durability

Strength, abrasion and other performance tests help manufacturers understand how a material may perform during use.

5. Supporting Quality-Control Systems

Regular testing creates a more structured quality-control process and helps manufacturers monitor production consistency.

Major Textile Testing Methods

1. Fabric GSM Testing

One of the most common textile testing methods is GSM testing.

GSM stands for Grams per Square Metre. It indicates the weight of a fabric over a defined area.

For example, a fabric with a GSM of 200 weighs approximately 200 grams per square metre.

Fabric GSM can influence several characteristics, including:

  • Fabric thickness
  • Fabric feel
  • Material cost
  • Durability
  • Suitability for specific applications

A typical GSM testing process involves cutting a fabric sample with a known area and measuring its weight using a precision balance.

Common equipment used includes:

  • GSM Cutter
  • GSM Testing Machine
  • Precision Weighing Balance

Accurate sample preparation is important because an incorrectly sized sample can affect the final calculation.

GSM testing is widely used by textile mills, garment manufacturers, fabric suppliers and quality-control laboratories. Amith Garment Services supplies GSM testing equipment designed for fabric quality-control applications.

2. Tensile Strength Testing

Tensile strength refers to the ability of a textile material to withstand pulling forces before breaking.

A Tensile Strength Tester applies controlled force to a fabric sample and measures how the material responds to the load.

This test can help evaluate:

  • Fabric strength
  • Breaking force
  • Material durability
  • Performance under mechanical stress

Tensile testing is particularly important for fabrics used in garments, industrial textiles and applications where mechanical strength is required.

Both woven and knitted fabrics may be tested using appropriate procedures and sample preparation methods.

A Universal Testing Machine or specialised tensile testing equipment may be used for evaluating mechanical properties.

3. Bursting Strength Testing

Bursting strength testing is used to determine how much pressure a fabric can withstand before rupture.

This method is particularly useful for fabrics where strength is applied in multiple directions rather than only in one direction.

Bursting strength testing is commonly used for:

  • Knitted fabrics
  • Stretch fabrics
  • Non-woven textiles
  • Technical textiles

During testing, pressure is gradually applied to the fabric sample until the material bursts. The force or pressure required to cause rupture is recorded.

The results can help manufacturers compare fabric performance and identify variations between production batches.

4. Tear Strength Testing

Tear strength testing measures the resistance of a fabric to the propagation of a tear.

A fabric may initially have good tensile strength but still perform poorly if a small cut or tear spreads easily.

Tear strength testing can be useful for evaluating:

  • Workwear
  • Denim
  • Outdoor fabrics
  • Industrial textiles
  • Upholstery materials

The test helps manufacturers understand how well a fabric may resist damage during handling and use.

5. Colour Fastness Testing

Colour fastness testing evaluates how well a textile retains its colour when exposed to different conditions.

Colour changes or colour transfer can affect the appearance and quality of garments.

Common colour fastness tests include:

  • Wash fastness
  • Rubbing fastness
  • Perspiration fastness
  • Light fastness

Why Is Colour Fastness Important?

Poor colour fastness can result in:

  • Fading
  • Colour bleeding
  • Staining of other garments
  • Customer complaints

Colour fastness testing helps manufacturers evaluate the performance of dyes and finishing processes.

Testing equipment may include washing fastness testers, crock meters and controlled lighting systems depending on the type of evaluation required.

6. Crocking or Rubbing Fastness Testing

Crocking is the transfer of colour from one textile surface to another due to rubbing.

A Crock Meter is commonly used to evaluate rubbing fastness under controlled conditions.

The test may be performed under:

  • Dry rubbing conditions
  • Wet rubbing conditions

During testing, a standard rubbing material is brought into contact with the textile sample using controlled pressure and movement.

The amount of colour transferred can then be evaluated according to the applicable testing procedure.

Rubbing fastness testing is particularly important for dyed and printed fabrics.

7. Abrasion Resistance Testing

Textiles are frequently exposed to friction during normal use.

Abrasion resistance testing evaluates how well a fabric withstands repeated rubbing and wear.

A Martindale Abrasion Tester is one commonly used instrument for evaluating fabric resistance to abrasion.

The test can help assess:

  • Surface wear
  • Fabric durability
  • Material suitability
  • Resistance to repeated use

Abrasion testing is commonly relevant for upholstery fabrics, workwear, uniforms and frequently used garments.

Repeated rubbing cycles can simulate wear conditions and help compare the durability of different textile materials.

8. Pilling Resistance Testing

Pilling occurs when small balls of tangled fibres develop on the surface of a fabric.

This can negatively affect the appearance of garments, especially after repeated wear and washing.

Pilling resistance testing helps manufacturers evaluate how likely a fabric is to develop pills under controlled conditions.

The results can be useful during:

  • Fabric development
  • Quality control
  • Material comparison
  • Supplier evaluation

Testing can help manufacturers select suitable fibres, yarn constructions and finishing processes.

9. Shrinkage and Dimensional Stability Testing

Many fabrics change dimensions after washing or drying.

Shrinkage testing evaluates changes in the length or width of a textile material after exposure to specified conditions.

Dimensional stability is particularly important because excessive shrinkage can affect:

  • Garment fit
  • Product appearance
  • Size consistency
  • Customer satisfaction

The testing process generally involves marking or measuring a fabric sample before and after the required treatment.

Specialised shrinkage templates and measuring scales can help improve consistency during the evaluation process.

Amith Garment Services provides shrinkage-related testing accessories as part of its fabric testing equipment range.

10. Fabric Inspection

Not every fabric quality issue requires laboratory testing. Visual inspection is also an important part of textile quality control.

A Fabric Inspection Machine helps manufacturers examine fabric rolls for visible defects.

Common defects may include:

  • Holes
  • Broken yarns
  • Uneven weaving
  • Dyeing defects
  • Printing defects
  • Colour variations
  • Streaks

Fabric inspection machines can also help improve the efficiency of fabric handling and inspection.

Early detection of visible defects can prevent unsuitable fabric from entering the cutting or garment production process.

11. Colour Matching and Visual Evaluation

Colour consistency is critical in textile and apparel production.

A colour that appears correct under one lighting condition may look different under another light source.

Colour matching equipment and controlled lighting systems help quality teams evaluate textile colours under defined viewing conditions.

A Colour Matching Cabinet can be used to examine samples under different lighting environments.

This process can help identify differences between:

  • Production batches
  • Supplier samples
  • Approved standards
  • Finished materials

Consistent colour evaluation can help reduce disagreements caused by subjective visual assessment.

12. Moisture and Fibre Testing

Textile quality testing can begin even before fabric production.

Fibre properties influence yarn quality and the final performance of the fabric.

Common fibre-related evaluations may include:

  • Fibre fineness
  • Fibre length
  • Moisture content
  • Fibre uniformity

Moisture levels can influence textile processing and the accuracy of certain measurements.

Fibre testing helps manufacturers understand the characteristics of raw materials before they enter later production stages.

Essential Equipment for a Textile Testing Laboratory

The exact equipment required depends on the type of textile products being manufactured.

However, a textile quality-control laboratory may include equipment such as:

  • GSM Cutter
  • GSM Weighing Balance
  • Tensile Strength Tester
  • Bursting Strength Tester
  • Crock Meter
  • Colour Matching Cabinet
  • Washing Fastness Tester
  • Martindale Abrasion Tester
  • Fabric Inspection Machine
  • Shrinkage Template
  • pH Meter
  • Moisture Meter
  • Universal Testing Machine

The correct combination of instruments should be selected based on the fabric type, production requirements and applicable testing procedures.

Amith Garment Services provides textile, fabric, yarn and garment testing instruments along with laboratory support and calibration-related services.

Textile Testing Standards

Textile testing procedures may be developed according to recognised standards or specific buyer requirements.

Common standards used in the textile industry include:

  • ISO
  • ASTM
  • AATCC
  • BS
  • Buyer-specific SOPs

The appropriate standard depends on the product, market and testing requirement.

It is important for laboratories to use suitable equipment, sample preparation procedures and test conditions for the method being followed.

How to Choose the Right Textile Testing Equipment

When selecting textile testing equipment, manufacturers should consider more than the initial cost.

Important factors include:

1. Type of Material

The equipment should be suitable for the fabrics or textile materials being tested.

2. Testing Requirements

Identify which properties need to be measured regularly.

3. Applicable Standards

Check whether the testing equipment supports the required testing procedures and specifications.

4. Accuracy and Repeatability

Reliable equipment should provide consistent results when used according to the recommended procedure.

5. Calibration Requirements

Regular verification and calibration can help maintain measurement reliability.

6. Technical Support

Installation assistance, operator training and after-sales support can be important for laboratories using specialised equipment.

Frequently Asked Questions

Textile testing methods are procedures used to evaluate the physical, mechanical, and performance properties of fibres, yarns, fabrics, and garments. These tests help determine textile quality, durability, safety, and compliance with industry requirements.

Fabric quality testing helps manufacturers identify defects, maintain production consistency, evaluate material performance, and ensure fabrics meet required specifications before production or shipment.

GSM testing measures the weight of fabric in grams per square metre. It is commonly used to monitor fabric weight, thickness, consistency, and production quality in textile manufacturing.

Common textile testing equipment includes GSM cutters, weighing balances, tensile strength testers, crock meters, abrasion testers, fabric inspection machines, colour matching cabinets, and other quality control instruments used for fabric and garment testing.

Colour fastness testing evaluates how well a textile retains its colour when exposed to conditions such as washing, rubbing, perspiration, and light. It helps ensure fabrics maintain colour quality during usage and meet buyer requirements.

Fabric inspection helps identify visible defects such as holes, weaving defects, colour variations, and printing problems before materials enter production. This improves quality control, reduces defects, and prevents costly rejections.

Conclusion

Textile testing methods are an essential part of maintaining consistent fabric and garment quality. From GSM measurement and strength testing to colour fastness, abrasion resistance and fabric inspection, each testing method provides valuable information about the performance of a textile material.

A well-planned fabric quality testing process can help manufacturers detect defects earlier, improve production consistency and make informed decisions about materials and processes.

For textile manufacturers, garment exporters and quality-control laboratories, selecting suitable testing equipment and following appropriate testing procedures are important steps towards building a reliable quality-control system.

Amith Garment Services provides a wide range of textile, fabric and garment testing equipment for quality-control laboratories and manufacturers across India, including GSM testing instruments, tensile strength testers, fabric inspection machines, abrasion testing equipment and other laboratory solutions.

GSM Testing Machine

GSM Testing Machine: How to Test Fabric GSM Step-by-Step and Avoid Common Testing Errors

Fabric quality is determined by several important parameters, and GSM (Grams per Square Metre) is one of the most commonly measured properties in textile manufacturing and quality control. GSM indicates the weight of fabric per square metre and helps manufacturers maintain consistency in fabric production, garment quality, and material specifications.

A GSM Testing Machine is used to determine the weight of textile materials accurately and efficiently. It is commonly used by textile manufacturers, garment industries, fabric suppliers, quality-control laboratories, and testing facilities.

Accurate GSM testing is important because even a small variation in fabric weight can affect the feel, thickness, appearance, durability, and overall performance of the finished product.

This guide explains how a GSM testing machine works, how to test fabric GSM step-by-step, common testing errors, GSM calculation, testing methods, and how to choose suitable GSM testing equipment for textile applications.


What Is GSM Testing in Textiles?

GSM stands for Grams per Square Metre. It represents the weight of a fabric in grams for an area of one square metre.

For example, if a fabric has a GSM of 180, it means that one square metre of the fabric weighs approximately 180 grams.

GSM testing is performed to:

  • Check fabric weight
  • Maintain production consistency
  • Compare fabrics with required specifications
  • Control fabric quality
  • Verify customer requirements
  • Identify variations between production batches
  • Support textile quality-control procedures

GSM can vary depending on the type of fabric, yarn, construction, finishing process, and manufacturing method.


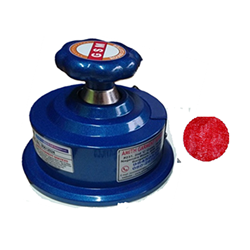
What Is a GSM Testing Machine?

A GSM Testing Machine is textile testing equipment designed to determine the weight of fabric or other sheet materials in grams per square metre.

A typical GSM testing setup may include a GSM sample cutter and a precision weighing balance.

The cutter is used to obtain a sample with a known area, while the weighing balance measures the sample’s weight. The measured weight can then be used to determine the GSM.

GSM testing equipment can be used for various textile materials, including:

  • Woven fabrics
  • Knitted fabrics
  • Non-woven materials
  • Garment fabrics
  • Textile samples
  • Paper and similar sheet materials, depending on equipment specifications

How Does a GSM Testing Machine Work?

The basic principle behind GSM testing is relatively simple.

First, a fabric sample of a known area is cut using a GSM cutter. The sample is then weighed using a precision balance.

The weight of the sample is used to calculate the fabric’s GSM.

For a standard sample area, the calculation can be simplified because the sample size is already known.

The basic principle is:

GSM = Weight of fabric sample ÷ Area of fabric sample × 10,000

When a standard 100 cm² GSM cutter is used, the calculation becomes:

GSM = Sample weight in grams × 100

For example, if a 100 cm² fabric sample weighs 1.8 grams:

GSM = 1.8 × 100 = 180 GSM

This makes GSM testing quick and convenient for textile quality-control applications.


How to Test Fabric GSM Step-by-Step

Accurate testing requires proper sample preparation and correct handling of the equipment.

Step 1: Select a Representative Fabric Sample

Select a representative portion of the fabric that accurately reflects the material being tested.

Avoid areas that are damaged, heavily creased, contaminated, or otherwise unsuitable for testing.

For production quality control, samples may be taken from different areas or batches according to the company’s testing procedure.

Step 2: Condition the Fabric if Required

Depending on the applicable testing method and laboratory procedure, the fabric may need to be conditioned under controlled atmospheric conditions before testing.

Conditioning can help minimize variations caused by moisture content.

Step 3: Place the Fabric on a Cutting Surface

Lay the fabric flat on a suitable cutting surface.

The material should be positioned without unnecessary folds or distortion.

Step 4: Cut the Sample Using a GSM Cutter

Place the GSM cutter on the fabric and cut the required sample.

A GSM cutter helps produce a sample with a predetermined area, improving consistency during testing.

Care should be taken to ensure that the cutter passes completely through the fabric.

Step 5: Weigh the Fabric Sample

Place the cut sample on a calibrated precision weighing balance.

Record the weight accurately.

The weighing balance should be placed on a stable surface and protected from conditions that could affect the measurement.

Step 6: Calculate the GSM

Use the appropriate formula based on the sample area.

For a 100 cm² sample:

GSM = Sample weight × 100

For example:

  • Sample weight = 2.2 grams
  • Sample area = 100 cm²
  • GSM = 2.2 × 100
  • GSM = 220

Therefore, the tested fabric has a GSM of approximately 220 g/m².

Step 7: Record and Compare the Result

Record the test result and compare it with the required fabric specification.

If the measured GSM falls outside the acceptable tolerance, further investigation may be required.


What Is a GSM Cutter?

A GSM Cutter is a precision cutting device used to cut fabric samples of a predetermined area for GSM testing.

Instead of manually measuring and cutting a fabric sample, a GSM cutter helps create a consistent sample size.

This improves testing efficiency and reduces errors associated with irregular sample dimensions.

A GSM cutter is commonly used together with a precision weighing balance as part of a fabric GSM testing setup.


GSM Testing Machine vs GSM Cutter: What’s the Difference?

These terms are sometimes used interchangeably, but they can refer to different components of the testing process.

GSM Testing Equipment Main Function
GSM Cutter Cuts a sample of predetermined area
Precision Balance Measures the weight of the sample
GSM Testing Setup Combines sample preparation and weighing for GSM determination
Digital GSM Balance Provides digital measurement of sample weight

A GSM cutter alone does not determine the GSM. The cut sample must also be accurately weighed and the result calculated.


Common GSM Testing Errors and How to Avoid Them

Accurate equipment alone does not guarantee accurate results. Testing technique is equally important.

1. Using an Incorrect Sample Size

An incorrectly sized sample can produce an incorrect GSM calculation.

Solution: Use a properly maintained GSM cutter and verify the sample dimensions where required.

2. Cutting Through an Uneven Area

Fabric can have variations in construction or finish.

Solution: Follow a consistent sampling procedure and test representative samples.

3. Weighing an Unconditioned Sample

Moisture can influence the weight of textile materials.

Solution: Follow the applicable conditioning requirements for the testing method.

4. Using an Uncalibrated Balance

An inaccurate balance can directly affect the final GSM result.

Solution: Regularly check and calibrate the weighing equipment according to the manufacturer’s recommendations and laboratory procedures.

5. Allowing Fabric Folds During Cutting

Wrinkles or folds can affect sample cutting.

Solution: Place the fabric flat and avoid unnecessary stretching or compression.

6. Ignoring Equipment Maintenance

Dust, damaged cutting blades, and other equipment issues can affect testing consistency.

Solution: Inspect, clean, and maintain the equipment regularly.

7. Testing Only One Sample

A single measurement may not always represent the entire fabric lot.

Solution: Where required, test multiple representative samples and evaluate the results according to the applicable testing procedure.


Why Accurate GSM Testing Matters in Textile Manufacturing

Fabric GSM can influence several characteristics of textile products.

Fabric Quality

Consistent GSM helps maintain uniformity across production batches.

Garment Appearance

Changes in fabric weight can affect drape, thickness, and appearance.

Production Control

Manufacturers can identify variations during production and take corrective action.

Customer Specifications

Many textile products are manufactured according to specified GSM ranges.

Material Cost

Fabric weight can influence material consumption and production costs.

Product Performance

Depending on the textile application, GSM can influence characteristics such as thickness, durability, comfort, and handling.


GSM Testing for Different Types of Fabrics

The GSM testing process may be applied to different textile structures, including:

Woven Fabric

Woven fabrics are produced by interlacing warp and weft yarns. GSM testing helps manufacturers monitor fabric weight and production consistency.

Knitted Fabric

Knitted fabrics are formed using loops of yarn. Their structure can make sample handling and conditioning particularly important.

Non-Woven Fabric

Non-woven materials are produced through processes other than traditional weaving or knitting. GSM can be an important quality parameter for many non-woven applications.

The exact testing procedure should always follow the relevant standard or specification for the material being tested.


GSM Testing Standards

Textile laboratories and manufacturers may follow recognized testing standards when determining fabric mass per unit area.

Depending on the material and testing requirement, standards may include ASTM and ISO methods, among others.

For example, ASTM D3776/D3776M is associated with mass per unit area of fabric, while ISO 3801 addresses determination of mass per unit length and mass per unit area of fabrics.

The applicable standard should be selected based on the material, customer requirements, laboratory procedure, and intended application.


How to Choose the Right GSM Testing Machine

When selecting GSM testing equipment, consider the following factors:

1. Type of Material

Determine whether the equipment will be used for woven, knitted, non-woven, or other materials.

2. Required Accuracy

Select equipment appropriate for the precision required by your testing application.

3. Sample Size

Check the cutter’s sample area and ensure that it suits your testing procedure.

4. Weighing Capacity

The balance should be suitable for the expected sample weights.

5. Ease of Operation

Simple and user-friendly equipment can improve testing efficiency.

6. Durability

For industrial environments, equipment should be robust enough for regular use.

7. Calibration and Maintenance

Consider the availability of calibration, maintenance, and technical support.

8. Compliance Requirements

If testing is performed according to a specific standard, ensure that the equipment and procedure are appropriate for that standard.


Applications of GSM Testing Equipment

GSM testing equipment is commonly used in:

  • Textile manufacturing
  • Garment manufacturing
  • Fabric inspection
  • Textile quality-control laboratories
  • Research and development
  • Non-woven manufacturing
  • Fabric suppliers
  • Textile testing laboratories
  • Production quality assurance

It can help organizations maintain consistency and verify that materials meet their required specifications.


GSM Testing Machine for Textile Quality Control

A reliable GSM testing setup can become an important part of a textile quality-control process.

By regularly measuring fabric GSM, manufacturers can identify variations before materials move further into production.

For example, if a fabric specification requires a particular GSM range, testing can help determine whether the produced material remains within the required tolerance.

This can reduce quality issues and help manufacturers maintain consistency between batches.

Frequently Asked Questions

A GSM Testing Machine is equipment used to determine the mass per square metre of fabric or other suitable sheet materials.

A representative fabric sample is cut to a known area using a GSM cutter, weighed using a precision balance, and the GSM is calculated from the sample weight and area.

A GSM testing setup generally uses a GSM cutter and precision weighing balance. Digital GSM testing equipment may combine or simplify these functions depending on the design.

GSM represents fabric weight per square metre, while thickness measures the physical thickness of the material. They are different properties and should not be treated as interchangeable.

No. A GSM cutter is used to obtain a sample of a known area. The sample must also be accurately weighed to determine GSM.

GSM helps manufacturers monitor fabric weight, consistency, quality, material specifications, and production requirements.

Calibration requirements depend on the equipment, testing procedure, laboratory requirements, and manufacturer's recommendations. Regular verification and calibration help maintain measurement reliability.

Yes, GSM testing can be applied to many types of textile materials, provided the appropriate sampling and testing procedure is followed.

Conclusion

GSM testing is an essential quality-control process in textile and garment manufacturing. A suitable GSM testing machine, GSM cutter, and precision weighing balance can help manufacturers accurately determine fabric weight and maintain consistency throughout production.

Correct sample preparation, accurate weighing, proper conditioning, equipment maintenance, and adherence to the applicable testing procedure are all important for reliable results.

For textile manufacturers and quality-control laboratories, investing in suitable GSM testing equipment can help improve testing efficiency and support consistent product quality.

If you are looking for reliable textile testing equipment, Amith Garment Services provides a range of textile testing solutions for fabric and garment quality-control applications. Explore the GSM testing equipment range and select the setup appropriate for your testing requirements.