
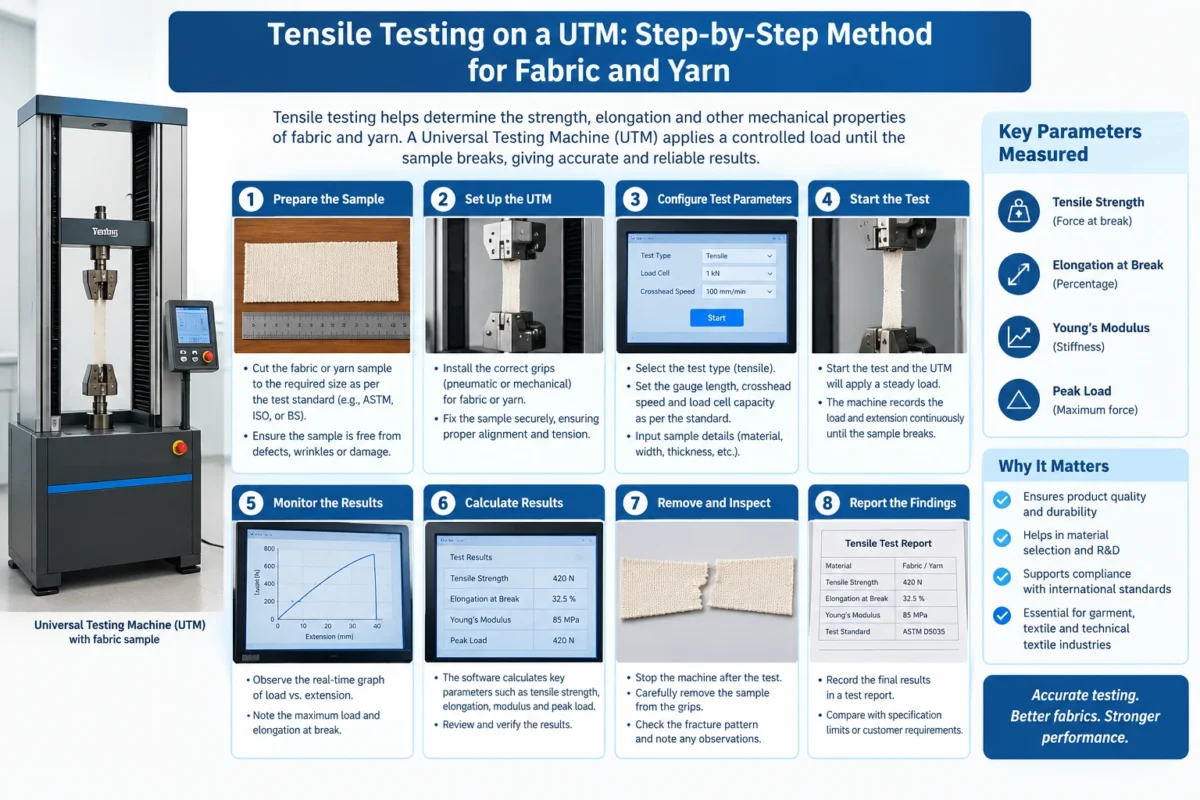
If you’ve spent any time on a textile testing floor, you already know that a fabric or yarn can look perfectly fine and still fail under load. That’s exactly why a universal testing machine tensile test exists — it tells you, in numbers, how much force a material can take before it gives way. For manufacturers, exporters, and testing labs across India’s textile hubs, this single test often decides whether a lot gets shipped or gets rejected.
This article walks through how tensile testing actually works on a Universal Testing Machine (UTM), what happens at each stage of the process, and the practical details that separate a reliable test from a questionable one.
What Is a Universal Testing Machine Tensile Test?
A universal testing machine tensile test measures how a material behaves when it is stretched until it breaks. The machine applies a steadily increasing pulling force to a fabric or yarn specimen while recording the force and the amount of stretch (elongation) at every point until failure.
A universal testing machine tensile test applies a controlled pulling force to a fabric or yarn sample until it breaks, while measuring breaking force and elongation. It helps determine how strong a material is and whether it meets required quality or export standards.
The term “universal” comes from the machine’s ability to perform more than one type of mechanical test — tension, and in many configurations, compression or bursting-related tests — depending on the fixtures fitted to it. For textile applications, the tensile mode is what’s used most often, since it directly reflects how a fabric or yarn will perform under real handling and wear.
Why Is Tensile Testing Important for Fabric and Yarn?
Textile products go through constant mechanical stress — stitching, washing, stretching during wear, and handling during manufacturing. A fabric that tears too easily or a yarn that snaps during weaving creates costly problems downstream.
Tensile testing is important because it predicts how fabric or yarn will hold up during manufacturing, washing, and everyday use. It helps identify weak batches before they reach production, reducing rejections, returns, and quality complaints from buyers.
Some practical reasons this test matters:
- It confirms whether incoming fabric or yarn meets buyer specifications before cutting or weaving begins.
- It flags inconsistencies between lots from the same supplier.
- It supports compliance documentation for garment exporters and buying houses.
- It helps quality managers catch process issues, such as poor yarn twist or uneven fabric construction, early.
How Does a Universal Testing Machine Work for Textiles?
At its core, a UTM has a fixed lower grip and a moving upper grip (the crosshead), driven by a motor. The specimen is clamped between the two grips. As the crosshead moves upward at a controlled speed, it stretches the specimen while a load cell continuously measures the resisting force.
This data is plotted as a force-extension curve, which shows how the material responds at every stage — from initial stretch, through any yielding, up to the point of complete failure. The gauge length (the distance between the grips at the start of the test) and the test speed are both set according to the applicable standard and material type, since these directly influence the recorded values.
Tensile Testing on a UTM: Step-by-Step Method
1. Prepare the UTM and Test Accessories
Before any specimen is loaded, the machine should be checked and calibrated as per laboratory protocol. The correct load cell capacity and grips — flat jaws for fabric, capstan or specific yarn grips for yarn — need to be fitted based on the material being tested.
2. Select and Prepare the Specimen
Specimens are cut or drawn according to the applicable test standard, taking care to avoid folds, creases, or visible defects that could distort results. For fabric, samples are typically taken in both warp and weft directions; for yarn, individual strands are prepared without unnecessary handling that could alter twist or tension.
3. Set the Test Parameters
Gauge length, test speed, and pre-tension (if applicable) are entered into the UTM’s software or control panel. These parameters depend entirely on the standard being followed and the material category — they are not one-size-fits-all settings.
4. Mount the Fabric or Yarn Specimen
The specimen is clamped centrally and squarely in the grips. Correct gripping is critical — if the specimen is angled, loose, or unevenly tensioned, the results will not reflect the material’s true strength.
5. Start the Tensile Test
Once mounted, the test is started, and the crosshead begins to move at the set speed, applying continuous tension until the specimen breaks or reaches the defined end condition.
6. Record Breaking Force and Elongation
The UTM logs the breaking force (the peak load recorded before failure) and the elongation at break (how much the specimen stretched at that point). Both values are captured automatically by the software in most modern machines.
7. Analyze and Report the Results
The force-extension curve is reviewed to check whether the specimen broke cleanly within the gauge area or slipped/failed at the grips — a slip invalidates the reading. Multiple repeat specimens are tested, and the results are averaged and reported alongside the standard followed.
UTM Tensile Testing for Fabric
Fabric tensile testing brings its own set of practical considerations. Fabric is tested separately in the warp and weft directions because woven fabrics are rarely equally strong in both directions — yarn density, weave pattern, and finishing processes all affect this.
Key points for fabric tensile testing:
- Specimen preparation must follow the applicable standard for width, length, and edge treatment (raveled or cut strip).
- Grip selection and jaw pressure need to be appropriate for the fabric’s thickness and surface — too little pressure causes slippage, too much can damage the yarns at the grip line.
- Fabric construction — woven, knitted, or nonwoven — changes how the material stretches; knitted fabrics generally show much higher elongation than woven fabrics due to their loop structure.
- Where seams are part of the test setup, it should be noted whether failure occurred at the seam or in the fabric itself, since this changes what the result actually tells you.
- Repeat testing across multiple specimens per direction gives a more reliable average than relying on a single reading.
UTM Tensile Testing for Yarn
Yarn tensile testing follows a different logic because yarn is a much finer, more flexible specimen than fabric.
Important factors include:
- Yarn count and construction — finer yarns naturally register lower breaking force than coarser ones, so results are usually interpreted alongside count.
- Twist level influences both strength and elongation; too little or too much twist relative to the yarn’s design can show up clearly in test results.
- Grip selection matters even more here, since yarn is prone to slippage at the jaws if the wrong grip type or pressure is used.
- The location of yarn break is worth noting — a break near the grip often signals a gripping problem rather than a true material weakness.
- Result consistency across repeat measurements is essential, since yarn is more variable along its length than fabric.
These results feed directly into decisions made during spinning, weaving, knitting, and downstream garment manufacturing, where yarn strength affects both process efficiency and final product performance.
Fabric Tensile Testing vs Yarn Tensile Testing
| Aspect | Fabric Tensile Testing | Yarn Tensile Testing |
| Specimen form | Strip or grab sample of fabric | Single yarn strand |
| Test directions | Warp and weft | Along the yarn axis only |
| Common grip type | Flat rubber-faced jaws | Capstan or specialized yarn grips |
| Key influencing factor | Weave/knit construction | Yarn count and twist |
| Typical failure point | Within gauge length or at seam | Within gauge length or near grip |
| Primary use | Fabric strength, garment quality | Spinning and weaving process control |
Important Test Parameters in Textile Tensile Testing
Several parameters influence the outcome of a tensile test, and each should be set according to the applicable standard rather than assumed:
- Gauge length – the initial distance between grips.
- Test speed – the rate at which the crosshead moves.
- Pre-tension – the small initial tension applied before the test begins, used for some yarn methods.
- Conditioning – textiles are sensitive to humidity and temperature, so specimens are often conditioned in a controlled atmosphere before testing to get comparable results.
International Standards for Textile Tensile Testing
Textile tensile testing is generally carried out with reference to internationally recognized standards, including:
- ISO 13934-1 – Tensile properties of fabrics using the strip method
- ISO 13934-2 – Tensile properties of fabrics using the grab method
- ISO 2062 – Determination of single-end breaking force and elongation at break for yarn
- ASTM D5034 – Breaking strength and elongation of textile fabrics (grab test)
- ASTM D5035 – Breaking force and elongation of textile fabrics (strip method)
The exact specimen dimensions, gauge length, test speed, conditioning requirements, and reporting format vary between these standards and depend on the material being tested. Laboratories should always refer to the latest edition of the applicable standard rather than relying on general guidance alone.
Factors That Affect Tensile Test Results
Even with a well-calibrated UTM, results can vary due to avoidable errors:
- Specimen slippage at the grips, which lowers the apparent breaking force
- Incorrect gripping or misaligned clamping, causing uneven load distribution
- Machine misalignment, which introduces bending stress instead of pure tension
- Inconsistent conditioning, since humidity changes fabric and yarn properties
- Wrong test direction, especially confusing warp and weft on anisotropic fabrics
- Calibration drift in the load cell or crosshead speed
- Incorrect test parameters entered for the material or standard
- Operator handling during specimen preparation and mounting
- Insufficient repeat testing, leading to results based on a single unrepresentative sample
How to Improve Textile Tensile Testing Accuracy
Improving accuracy comes down to discipline in the basics rather than expensive upgrades:
- Calibrate the UTM and load cell on a regular schedule
- Condition specimens as specified before testing
- Use the correct grip type and jaw pressure for the material
- Align specimens carefully and consistently
- Follow the exact parameters specified in the chosen standard
- Test enough repeat specimens to get a statistically meaningful average
- Document any slippage, grip failure, or abnormal breaks separately from valid results
Choosing the Right Universal Testing Machine for Textiles
When evaluating a Universal Testing Machine for textiles, labs typically look at the range of load cells available, the variety of grips and fixtures that can be fitted, software capability for recording force-extension curves, and ease of switching between fabric and yarn testing setups. The right choice depends on the range of materials a lab regularly tests and the standards it needs to comply with.
Industries That Use UTM Tensile Testing
Tensile testing on a UTM is used well beyond a single sector:
- Textile manufacturing units checking incoming raw material and in-process fabric
- Garment factories verifying fabric strength before cutting
- Textile exporters meeting buyer and compliance requirements
- Textile testing laboratories offering independent verification services
- Buying houses conducting pre-shipment quality checks
- Technical textile and nonwoven producers checking material performance for specialized applications
Textile clusters such as Tiruppur and other manufacturing regions across India rely heavily on this kind of testing to maintain consistent quality for both domestic and export markets.
Why Choose Amith Garment Services
Amith Garment Services works with textile manufacturers, garment exporters, testing laboratories, and quality control teams who need dependable Textile Testing Equipment for day-to-day fabric and yarn evaluation. Alongside Universal Testing Machines, the range of Textile Laboratory Equipment supports broader quality control needs — from colour fastness to fabric inspection — helping labs build a complete, standards-based testing setup suited to their specific product range.
Conclusion
A universal testing machine tensile test remains one of the most direct ways to verify how a fabric or yarn will actually perform once it leaves the lab. Getting reliable results depends less on the machine alone and more on consistent specimen preparation, correct gripping, proper conditioning, and adherence to the relevant standard. For manufacturers, exporters, and testing labs working to consistent quality benchmarks, a properly selected and well-maintained UTM, used with disciplined testing practices, remains central to dependable textile quality control.
Frequently Asked Questions
A universal testing machine tensile test is a laboratory procedure where a fabric or yarn specimen is stretched under controlled conditions until it breaks. The machine records the breaking force and elongation throughout the process. This data helps textile manufacturers, exporters, and testing labs verify whether a material meets required strength specifications before it moves further into production or shipment.
Yes, a single UTM can test both fabric and yarn, provided it is fitted with the correct grips and load cell for each material type. Fabric typically requires flat jaw grips, while yarn testing often uses capstan or specialized grips to reduce slippage. The test parameters, such as gauge length and speed, are also adjusted according to the material and applicable standard.
During textile tensile testing, the two primary measurements are breaking force and elongation at break. Breaking force shows the maximum load the specimen withstood, while elongation shows how much it stretched before failing. Together, these values are plotted as a force-extension curve, which gives a fuller picture of how the material behaves under increasing tension.
Specimen preparation directly affects the reliability of tensile test results. Incorrect cutting, damaged edges, improper conditioning, or inconsistent handling can all distort the breaking force and elongation values recorded. Careful preparation, following the relevant standard, ensures that the universal testing machine tensile test reflects the true strength of the fabric or yarn rather than an error introduced during setup.
It's used to check how strong a fabric or yarn is by pulling it until it breaks and measuring the force and stretch involved, which helps confirm quality before manufacturing or export.
You cut fabric strips in the warp and weft directions, clamp them into the UTM's grips, and stretch them at a set speed until they break, recording the force and stretch at that point.
A yarn strand is clamped carefully to avoid slipping, then stretched at a controlled speed until it snaps, with the machine recording the breaking force and elongation.
It means how much a fabric or yarn stretches, as a percentage of its original length, right before it breaks during the tensile test.